终于到了核心部分之一了——消息机制
一般消息的流转
既然讲到消息,我们要到消息的源头——客户端
来到Unity.Hotfix的Init文件,并定位到这一句
1 Game.EventSystem.Run(EventIdType.InitSceneStart);
他会执行这里的Run代码(不知道为何的去复习ETBook的EventSystem哦)
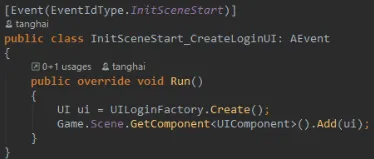
进入UILoginFactory,他是登录UI的工厂类,在这个工厂将完成一系列的操作
1 2 3 4 5 6 7 8 9 10 11 12 ResourcesComponent resourcesComponent = ETModel.Game.Scene.GetComponent<ResourcesComponent>(); resourcesComponent.LoadBundle(UIType.UILogin.StringToAB()); GameObject bundleGameObject = (GameObject)resourcesComponent.GetAsset(UIType.UILogin.StringToAB(), UIType.UILogin); GameObject gameObject = UnityEngine.Object.Instantiate(bundleGameObject); UI ui = ComponentFactory.Create<UI, string , GameObject>(UIType.UILogin, gameObject, false ); ui.AddComponent<UILoginComponent>();
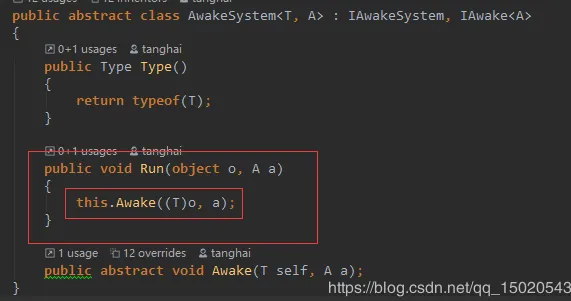
然后我们知道添加一个组件会执行其的Awake函数(如果存在并写明了继承自AwakeSystem的类),我们看到,他在Awake里面从其挂载的ReferenceCollector取得自身子物体的引用,并且为Button添加了点击事件
1
2
3
4
5
6
7
8
9
10
11
12
public void Awake () { ReferenceCollector rc = this .GetParent<UI().GameObject.GetComponent<ReferenceCollector>(); loginBtn = rc.Get<GameObject>("LoginBtn" ); loginBtn.GetComponent<Button>().onClick.Add(OnLogin); this .account = rc.Get<GameObject>("Account" ); } public void OnLogin (){ LoginHelper.OnLoginAsync(this .account.GetComponent<InputField>().text).Coroutine(); }
那么我们去看OnLoginAsync函数 ,知道我为什么在最后空两行吗?(观众:装起来了???)
是因为这里用的await 和 Session.Call方法,await是阻塞方法,在返回结果之前不会继续往下走,而Call是要求有反馈消息的,综上只有在收到消息或者遇到异常才会有可能(异常的话程序将停止运行)执行到R2C_Login reCLogin这里,然后才会走最后一行
1 2 3 4 5 6 7 8 9 10 ETModel.Session session = ETModel.Game.Scene.GetComponent<NetOuterComponent>().Create(GlobalConfigComponent.Instance.GlobalProto.Address); Session realmSession = ComponentFactory.Create<Session, ETModel.Session>(session); R2C_Login r2CLogin = (R2C_Login) await realmSession.Call(new C2R_Login() { Account = account, Password = "111111" }); realmSession.Dispose();
注意 第二句的Awake注册了消息回调函数,并且这里的Session是ETHotfix的,与ETModel下的Session有区别
1
2
3
4
5
6
7
public override void Awake (Session self, ETModel.Session session ) { self.session = session; SessionCallbackComponent sessionComponent = self.session.AddComponent<SessionCallbackComponent>(); sessionComponent.MessageCallback = (s, opcode, memoryStream) => { self.Run(s, opcode, memoryStream); }; sessionComponent.DisposeCallback = s => { self.Dispose(); }; }
**好,既然消息发走了,我们就去看服务端了 **
我们直接从NetworkComponent看起吧(事实上客户端和服务端用的是同一个NetworkComponent,所以这里的NetworkComponent组件看完就不需要重复看客户端的了)
1 2 3 4 5 6 7 8 9 10 11 12 13 14 15 16 17 18 19 20 21 22 23 24 25 26 Game.Scene.AddComponent<NetOuterComponent, string >(outerConfig.Address); | | \|/ K component = ComponentFactory.CreateWithParent<K, P1>(this , p1, this .IsFromPool); | | \|/ Game.EventSystem.Awake(component, a); | | \|/ [ObjectSystem ] public class NetOuterComponentAwake1System : AwakeSystem <NetOuterComponent , string >{ public override void Awake (NetOuterComponent self, string address ) { } } | | \|/ public void Awake (NetworkProtocol protocol, string address, int packetSize = Packet.PacketSizeLength2 ){ }
因为默认是TCP,所以绑定OnAccept(当收到消息,他会被调用)
1
2
3
4
5
6
7
8
9
10
11
12
13
14
15
16
17
18
19
20
21
22
23
24
25
26
27
28
29
30
31
32
33
34
35
36
37
38
39
public void OnAccept (AChannel channel ) | | \|/ public void Awake (AChannel aChannel ) | | \|/ 注册收到消息回调函数 public void OnRead (MemoryStream memoryStream ) | | \|/ public override void Start () | | \|/ 开始接收消息 private void StartRecv () | | \|/ 接收消息完毕,解析好收到的信息,通过消息回调函数处理消息, 如果是热更层的消息,就调用ETHotfix.Session里注册的回调函数处理, 否则就用ETModel.Session里的函数处理, (其实两者也是大同小异,大家可以自行查看各个Session的Run函数) 这里面又涉及到消息分发组件MessageDispatcherComponent以及requestCallback的细节, 大家可以自行查看 最后发送消息 | | \|/ public void StartSend ()
更多细节我会在之后介绍,我们这里的Handler是C2R_LoginHandler.cs
1 2 3 4 5 6 7 8 9 10 11 12 13 14 15 16 17 18 19 20 21 22 23 24 25 26 27 28 29 StartConfig config = Game.Scene.GetComponent<RealmGateAddressComponent>().GetAddress(); IPEndPoint innerAddress = config.GetComponent<InnerConfig>().IPEndPoint; Session gateSession = Game.Scene.GetComponent<NetInnerComponent>().Get(innerAddress); G2R_GetLoginKey g2RGetLoginKey = (G2R_GetLoginKey)await gateSession.Call(new R2G_GetLoginKey() {Account = message.Account}); string outerAddress = config.GetComponent<OuterConfig>().Address2;response.Address = outerAddress; response.Key = g2RGetLoginKey.Key; reply(response);
好了,服务端的消息发过来了,我们客户端要响应吧,再回到客户端,这时候r2CLogin已经被赋好值了,可以进行下面的操作了。
Actor消息的流转
继续上一次的一般消息流转,那么这次,我们来走一遍ET的另一核心——Actor消息机制 继续上次,我们回到客户端
1 2 3 4 5 6 7 8 9 10 11 12 13 14 15 ETModel.Session gateSession = ETModel.Game.Scene.GetComponent<NetOuterComponent>().Create(r2CLogin.Address); ETModel.Game.Scene.AddComponent<ETModel.SessionComponent>().Session = gateSession; Game.Scene.AddComponent<SessionComponent>().Session = ComponentFactory.Create<Session, ETModel.Session>(gateSession); G2C_LoginGate g2CLoginGate = (G2C_LoginGate)await SessionComponent.Instance.Session.Call(new C2G_LoginGate() { Key = r2CLogin.Key }); Log.Info("登陆gate成功!" );
然后回到服务端
1 2 3 4 5 6 7 8 9 10 11 12 13 14 15 16 17 18 19 20 21 22 23 24 25 26 string account = Game.Scene.GetComponent<GateSessionKeyComponent>().Get(message.Key);if (account == null ){ response.Error = ErrorCode.ERR_ConnectGateKeyError; response.Message = "Gate key验证失败!" ; reply(response); return ; } Player player = ComponentFactory.Create<Player, string >(account); Game.Scene.GetComponent<PlayerComponent>().Add(player); session.AddComponent<SessionPlayerComponent>().Player = player; session.AddComponent<MailBoxComponent, string >(MailboxType.GateSession); response.PlayerId = player.Id; reply(response); session.Send(new G2C_TestHotfixMessage() { Info = "recv hotfix message success" });
再回到客户端
1 2 3 4 5 6 7 8 9 10 11 12 13 Log.Info("登陆gate成功!" ); Player player = ETModel.ComponentFactory.CreateWithId<Player>(g2CLoginGate.PlayerId); PlayerComponent playerComponent = ETModel.Game.Scene.GetComponent<PlayerComponent>(); playerComponent.MyPlayer = player; Game.EventSystem.Run(EventIdType.LoginFinish); G2C_PlayerInfo g2CPlayerInfo = (G2C_PlayerInfo) await SessionComponent.Instance.Session.Call(new C2G_PlayerInfo()); Debug.Log("测试玩家信息为" + g2CPlayerInfo.Message);
这下我们不用再回到服务端了,因为一般消息的流转我们了解的已经差不多了,我们直接来到下一个重要的阶段
来到MapHelper.cs类,查看登录Map服务器相关代码
1 2 3 4 5 6 7 8 9 10 11 12 13 14 15 ResourcesComponent resourcesComponent = ETModel.Game.Scene.GetComponent<ResourcesComponent>(); await resourcesComponent.LoadBundleAsync($"unit.unity3d" );await ETModel.Game.Scene.GetComponent<ResourcesComponent>().LoadBundleAsync("map.unity3d" );using (SceneChangeComponent sceneChangeComponent = ETModel.Game.Scene.AddComponent<SceneChangeComponent>()){ await sceneChangeComponent.ChangeSceneAsync(SceneType.Map); } G2C_EnterMap g2CEnterMap = await ETModel.SessionComponent.Instance.Session.Call(new C2G_EnterMap()) as G2C_EnterMap;
好了,我们又要去服务端了,注意,下面的消息是属于服务器内部的消息流通,所以不用网络层的传输,直接进行内部数据传输最后被响应Handler处理
1 2 3 4 5 6 7 8 9 10 Player player = session.GetComponent<SessionPlayerComponent>().Player; IPEndPoint mapAddress = StartConfigComponent.Instance.MapConfigs[0 ].GetComponent<InnerConfig>().IPEndPoint; Session mapSession = Game.Scene.GetComponent<NetInnerComponent>().Get(mapAddress); M2G_CreateUnit createUnit = (M2G_CreateUnit) await mapSession.Call(new G2M_CreateUnit() { PlayerId = player.Id, GateSessionId = session.InstanceId });
那我们直接到它的Handler这里吧
1 2 3 4 5 6 7 8 9 10 11 12 13 14 15 16 17 18 19 20 21 22 23 24 25 26 27 28 29 30 31 32 33 34 35 Unit unit = ComponentFactory.CreateWithId<Unit>(IdGenerater.GenerateId()); unit.AddComponent<MoveComponent>(); unit.AddComponent<UnitPathComponent>(); unit.Position = new Vector3(-10 , 0 , -10 ); await unit.AddComponent<MailBoxComponent>().AddLocation();unit.AddComponent<UnitGateComponent, long >(message.GateSessionId); Game.Scene.GetComponent<UnitComponent>().Add(unit); response.UnitId = unit.Id; M2C_CreateUnits createUnits = new M2C_CreateUnits(); Unit[] units = Game.Scene.GetComponent<UnitComponent>().GetAll(); foreach (Unit u in units){ UnitInfo unitInfo = new UnitInfo(); unitInfo.X = u.Position.x; unitInfo.Y = u.Position.y; unitInfo.Z = u.Position.z; unitInfo.UnitId = u.Id; createUnits.Units.Add(unitInfo); } MessageHelper.Broadcast(createUnits); reply(response);
注意,这里面的MessageHelper.Broadcast(createUnits); 就是我们的核心Actor机制的体现了,我们只要把消息发到gatesession,gatesession将会自动根据id转发消息到相应客户端,而里面涉及到的相关ID,我们在由gate服务器向map服务器发送创建战斗单位请求的时候,已经传好参数了
1 2 3 4 5 6 7 8 ActorSenderComponent actorSenderComponent = Game.Scene.GetComponent<ActorSenderComponent>(); ActorMessageSender actorMessageSender = actorSenderComponent.Get(unitGateComponent.GateSessionActorId); actorMessageSender.Send(message); var response = actorMessageSender.Call(message);
好了,回到客户端
1 2 3 4 5 6 7 8 PlayerComponent.Instance.MyPlayer.UnitId = g2CEnterMap.UnitId; Game.Scene.AddComponent<OperaComponent>(); Game.EventSystem.Run(EventIdType.EnterMapFinish);
然后我们突然想起来,刚刚亡灵领主出生的时候向别的小骷髅广播了一下来着,我们看会做什么操作
1
2
3
4
5
6
7
8
9
10
foreach (UnitInfo unitInfo in message.Units) { if (unitComponent.Get(unitInfo.UnitId) != null ) { continue ; } Unit unit = UnitFactory.Create(unitInfo.UnitId); unit.Position = new Vector3(unitInfo.X, unitInfo.Y, unitInfo.Z); }
好了 ,小骷髅都安排好了,该向服务端发消息了,也就是寻路,还记得我们之前添加的****OperaComponent,他就是负责寻路的
1 2 3 4 5 6 7 8 9 10 11 12 13 14 15 16 17 18 19 20 21 22 23 24 25 26 27 28 29 30 ETModel.SessionComponent.Instance.Session.Send(frameClickMap); | | | \|/ Vector3 target = new Vector3(message.X, message.Y, message.Z); unit.GetComponent<UnitPathComponent>().MoveTo(target).Coroutine(); | | | \|/ await self.MoveAsync(self.ABPath.Result); | | | \|/ if (i % 3 == 1 ){ self.BroadcastPath(path, i, 3 ); } | | | \|/ unitPathComponent.StartMove(message).Coroutine();
后记
至此,连接服务器,创建小骷髅,并且自动寻路的操作就完成了,我中间很多细节没有讲,其实没必要讲(观众:懒还有理了???),那些东西需要大家自行理解和体会的,而到现在master的Demo解读也该告一段落了。
消息总结
不同Session(服务器)相关名称及其含义
Manager:连接客户端的外网和连接内部服务器的内网,对服务器进程进行管理,自动检测和启动服务器进程。加载有内网组件NetInnerComponent,外网组件NetOuterComponent,服务器进程管理组件。自动启动突然停止运行的服务器,保证此服务器管理的其它服务器崩溃后能及时自动启动运行。 Realm:对ActorMessage消息进行管理(添加、移除、分发等),连接内网和外网,对内网服务器进程进行操作,随机分配Gate服务器地址。加载有ActorMessage消息分发组件ActorMessageDispatherComponent,ActorManager消息管理组件ActorManagerComponent,内网组件NetInnerComponent,外网组件NetOuterComponent,服务器进程管理组件LocationProxyComponent,Gate服务器随机分发组件。客户端登录时连接的第一个服务器,也可称为登录服务器。 Gate:对玩家进行管理,对ActorMessage消息进行管理(添加、移除、分发等),连接内网和外网,对内网服务器进程进行操作,随机分配Gate服务器地址,对Actor消息进程进行管理,对玩家ID登录后的Key进行管理。加载有玩家管理组件PlayerComponent,ActorMessage消息分发组件ActorMessageDispatherComponent,ActorManager消息管理组件ActorManagerComponent,内网组件NetInnerComponent,外网组件NetOuterComponent,服务器进程管理组件LocationProxyComponent,Actor消息管理组件ActorProxyComponent,管理登陆时联网的Key组件GateSessionKeyComponent。对客户端的登录信息进行验证和客户端登录后连接的服务器,登录后通过此服务器进行消息互动,也可称为验证服务器。 Location:连接内网,服务器进程状态集中管理(Actor消息IP管理服务器)。加载有内网组件NetInnerComponent,服务器消息处理状态存储组件LocationComponent,也可称为进程管理组件。 Map:连接内网,对ActorMessage消息进行管理(添加、移除、分发等),对场景内现在活动物体存储管理,对内网服务器进程进行操作,对Actor消息进程进行管理,对ActorMessage消息进行管理(添加、移除、分发等),服务器帧率管理。ActorMessage消息分发组件ActorMessageDispatherComponent,ActorManager消息管理组件ActorManagerComponent,内网组件NetInnerComponent,服务器进程管理组件LocationProxyComponent,服务器帧率管理组件ServerFrameComponent,可以称为内网组件。 AllServer:将以上服务器功能集中合并成一个服务器。另外增加DB连接组件DBComponent,DB管理组件DBProxyComponent。 Benchmark:连接内网和测试服务器承受力。加载有内网组件NetInnerComponent,服务器承受力测试组件BenchmarkComponent。
不同消息及其对应特性
不需要返回结果的消息 IMessage 需要返回结果的消息 IRequest 用于回复的消息 IResponse 不需要返回结果的Actor消息 IActorMessage,IActorLocationMessage 需要返回结果的Actor消息 IActorRequest IActorLocationRequest 用于回复的Actor消息 IActorResponse IActorLocationResponse

 微信
微信 支付宝
支付宝