前言
由于之前已经写过很多ET相关教程,本篇文章主要提及ET6.0的新概念和新特性,其实6.0很多知识点和之前版本一样适用,想看ET之前版本教程的,可以前往:ET篇:个人笔记汇总
本文写作时对应的commit版本:https://github.com/egametang/ET/commit/43abb90cd05445f2e9a0625ac12caaab59486672
基础概念
此部分内容参考:ET6.0的设计思路 推荐大家有问题先去ET论坛逛逛,里面有很多管理员整理好的日常讨论答案,技术教程,以及其他朋友提出的问题,可以学到很多知识。
ET 6.0创新概览
- 之前每个功能是一个进程,比如realm gate location map,现在改成每个功能是一个Scene,一个Scene可以放到一个进程中。这样一台物理机先启动固定的进程,然后各个scene放到进程中运行。非常类似docker。
- 所有的Scene放在一个进程就变成了AllServer模式
- 服务器内部全部使用actor发送消息,比如realm发给gate,其实是发个actor消息到gate scene
- dbserver将取消,每个进程直连mongodb,使用异步调用存取数据
- 协程锁简化了很多实现,例如location队列,actor队列,mailbox消息队列,全部使用协程锁实现,代码非常精简。
- Scene可以开服前配置好在哪个进程(比如realm gate)也可以动态创建(比如副本,分线场景)。动态创建Scene回收Scene非常简单。
- view层跟逻辑层完全分离,可以利用逻辑层代码写机器人。服务端分区支持,多个分区都能放到一个进程。
- 一个端就能完成任何测试,还能写机器人测试用例。这个解决大问题了,因为大家都知道游戏逻辑因为耦合非常严重,是很难写方法级别的单元测试,et6的这个设计可以非常方便的让大家写出协议级别的单元测试。并且一键开启上万个机器人来压测,把并发bug扼杀在摇篮里,开个客户端,同时点几下按钮就加了几个机器人,类似组队这种逻辑就可以一个人测试完成
Domain
domain就是指这个entity属于哪个scene,毕竟一个进程上可以容纳多个scene
domain还有个很重要的作用,就是设置domain的时候才会执行反序列化system,还有注册eventsystem
domain简单说是指属于哪个scene, 每个entity都有个domain字段,这样写逻辑方便能拿到自己scene上的数据
多进程多scene,具体scene放到那个进程完全取决于配制,全放到一个进程就是allserver了
如果是个很大的scene,需要容纳很多人,可能就需要单独占用一个进程,这样才能完全利用一个核
把每个scene都分配一个进程,就跟5.0差不多了
Ray:
et一开始就是多进程嘛…没毛病.不过现在是在进程内又开辟了相对独立的容器.熊猫能说说这么改的实际应用场景吗…什么实际需求促使了你做这个大刀阔斧的改动
熊猫:
@Ray 原因是很多动态副本跟分线的需求,现在可以16核机器起16个进程,然后动态分配副本跟分线到进程上.
比如很多单人副本,没必要一下子开很多进程来支持。需要的时候找一个负载低的进程动态创建一个就行了,用完就可以回收了
客户端
客户端domain也有用,客户端也会存在多个scenes。比如Game.Scene是永久存在的,再搞个Scene挂在Game.Scene下面作为当前进入的场景,切换场景的时候删除这个scene再创建一个scene。
Justin沙特王子:
我还是期待ET6.0能把客户端层给删掉。。。
熊猫:
删掉客户端?等6.0出来就知道et双端威力了。机器人框架就是服务端跟客户端合成一个程序,机器人直接使用客户端代码跑在linux上.
还有测试用例框架,直接调用客户端代码发送消息给服务端,不双端怎么能做到?
Entity&&Component
6.0把child集成到了Entity,跟Component并列,一个Entity必须设置Parent。这样删除一个Entity能把他的所有组件跟children全部删掉
热更新方案
没用了解过cs2lua,怕有坑,对于6.0咬定cs.lua本人持观望态度
因为对ILRuntime比较了解,并且与ET相性较好(基本上不需要跨域继承,仅这一点可以避免很多坑)个人选择仍然是ILRuntime,目前已经自己接入了,还包含了资源热更新:ET6.0 with ILRuntime && xAsset
流程
和大家一起过一下官方Demo的运行和通信流程
服务端初始化流程
老规矩还是我们的Server.App项目作为启动项
1
2
3
4
5
6
| List<Type> types = new List<Type>();
types.AddRange( typeof(Game).Assembly.GetTypes());
types.AddRange( DllHelper.GetHotfixAssembly().GetTypes());
Game.EventSystem.AddRangeType(types);
Game.EventSystem.TypeMonoInit();
Game.EventSystem.EventSystemInit();
|
先注册全部的类型到事件系统,作为ET框架的驱动基石
1
2
| ProtobufHelper.Init();
MongoHelper.Init();
|
这两句代码主要是对两个序列化库做的初始化,大多是一些注册类型的操作
1
2
3
4
5
6
7
8
9
|
Options options = null;
Parser.Default.ParseArguments<Options>(args)
.WithNotParsed(error => throw new Exception($"命令行格式错误!"))
.WithParsed(o => { options = o; });
GloabDefine.Options = options;
GloabDefine.ILog = new NLogger(GloabDefine.Options.AppType.ToString());
LogManager.Configuration.Variables["appIdFormat"] = $"{GloabDefine.Options.Process:000000}";
Log.Info($"server start........................ {Game.Scene.Id}");
|
这些全都是配置操作,由于我们传入程序的启动参数args为空所以会使用Options定义的默认值。
注意第7行会为NLog配置Log格式。注意我们在Option里面配置了Log等级,如果目标Log的等级没有达到我们配置的等级,就将不会打印
我们默认使用了NLog作为Log方案:NLog简单入门 ,项目Log输出目录位于 ET/Log/ 文件夹中
1
| Game.EventSystem.Publish(new EventType.AppStart());
|
第一行抛出事件开启内部初始化流程,注意ET6.0的事件系统参数已经改为支持参数的struct类型,下面是抛出的事件会执行的逻辑
1
2
3
4
5
6
7
8
9
10
11
12
13
14
15
16
17
18
19
20
21
22
23
24
25
26
27
28
29
30
31
32
33
34
35
36
37
38
39
40
41
42
43
44
45
46
47
48
49
50
51
52
53
54
55
56
| public class AppStart_Init: AEvent<EventType.AppStart>
{
protected override async ETTask Run(EventType.AppStart args)
{
Game.Scene.AddComponent<ConfigComponent>();
await ConfigComponent.Instance.LoadAsync();
StartProcessConfig processConfig = StartProcessConfigCategory.Instance.Get(GloabDefine.Options.Process);
Game.Scene.AddComponent<TimerComponent>();
Game.Scene.AddComponent<OpcodeTypeComponent>();
Game.Scene.AddComponent<MessageDispatcherComponent>();
Game.Scene.AddComponent<CoroutineLockComponent>();
Game.Scene.AddComponent<ActorMessageSenderComponent>();
Game.Scene.AddComponent<ActorLocationSenderComponent>();
Game.Scene.AddComponent<LocationProxyComponent>();
Game.Scene.AddComponent<ActorMessageDispatcherComponent>();
Game.Scene.AddComponent<NumericWatcherComponent>();
Game.Scene.AddComponent<NetThreadComponent>();
switch (GloabDefine.Options.AppType)
{
case AppType.Server:
{
Game.Scene.AddComponent<NetInnerComponent, IPEndPoint>(processConfig.InnerIPPort);
List<StartSceneConfig> processScenes = StartSceneConfigCategory.Instance.GetByProcess(GloabDefine.Options.Process);
foreach (StartSceneConfig startConfig in processScenes)
{
await SceneFactory.Create(Game.Scene, startConfig.Id, startConfig.InstanceId, startConfig.Zone, startConfig.Name,
startConfig.Type, startConfig);
}
break;
}
case AppType.Watcher:
{
StartMachineConfig startMachineConfig = WatcherHelper.GetThisMachineConfig();
WatcherComponent watcherComponent = Game.Scene.AddComponent<WatcherComponent>();
watcherComponent.Start(GloabDefine.Options.CreateScenes);
Game.Scene.AddComponent<NetInnerComponent, IPEndPoint>(NetworkHelper.ToIPEndPoint($"{startMachineConfig.InnerIP}:{startMachineConfig.WatcherPort}"));
break;
}
case AppType.GameTool:
break;
}
if (GloabDefine.Options.Console == 1)
{
Game.Scene.AddComponent<ConsoleComponent>();
}
}
}
|
对于创建Scene的代码如下所示,会根据Scene类型不同而添加不同的组件
1
2
3
4
5
6
7
8
9
10
11
12
13
14
15
16
17
18
19
20
21
22
23
24
25
26
| public static async ETTask<Scene> Create(Entity parent, long id, long instanceId, int zone, string name, SceneType sceneType, StartSceneConfig startSceneConfig = null)
{
await ETTask.CompletedTask;
Scene scene = EntitySceneFactory.CreateScene(id, instanceId, zone, sceneType, name, parent);
scene.AddComponent<MailBoxComponent, MailboxType>(MailboxType.UnOrderMessageDispatcher);
switch (scene.SceneType)
{
case SceneType.Realm:
scene.AddComponent<NetKcpComponent, IPEndPoint>(startSceneConfig.OuterIPPort);
break;
case SceneType.Gate:
scene.AddComponent<NetKcpComponent, IPEndPoint>(startSceneConfig.OuterIPPort);
scene.AddComponent<PlayerComponent>();
scene.AddComponent<GateSessionKeyComponent>();
break;
case SceneType.Map:
scene.AddComponent<UnitComponent>();
scene.AddComponent<RecastPathComponent>();
break;
case SceneType.Location:
scene.AddComponent<LocationComponent>();
break;
}
return scene;
}
|
之后会进入轮询,不断地更新框架状态
1
2
3
4
5
6
7
8
9
10
11
12
13
14
15
| while (true)
{
try
{
Thread.Sleep(1);
ThreadSynchronizationContext.Instance.Update();
Game.Update();
Game.LateUpdate();
Game.FrameFinish();
}
catch (Exception e)
{
Log.Error(e);
}
}
|
总结
-
通过启动参数确定Option的数据(如果启动参数为空,则使用默认的Option数据),其中记录了进程Id(Option.Process)等关键数据
-
拿着这个Option.Process去StartProcessConfig得到此进程对应的物理机器Id以及此进程对应的内网端口
-
拿着这个物理机器Id去StartMachineConfig获取物理机的内网IP和外网IP,以供下面Scene中网络组件的初始化
-
进行进程基础组件的添加,例如Actor组件,协程锁组件等
-
拿着这个进程Option.Process去StartSceneConfig获取所有归属于此进程的Scenes以及Scene的外网端口,并且创建这些Scene
至此,完成服务端所有初始化工作
但是对于StartZoneConfig的使用,Demo并未给出,个人猜测Zone号是每个Scene所对应的区号,不同的区号会连接到不同的数据库
客户端初始化流程
现在我们来到客户端,走一下初始化流程
前面说过了Server的AppStart事件通知流程,所以这里我们直接来到客户端AppStart事件通知后的地方
1
2
3
4
5
6
7
8
9
10
11
12
13
14
15
16
17
18
19
20
21
22
23
24
25
| public class AppStart_Init: AEvent<EventType.AppStart>
{
protected override async ETTask Run(EventType.AppStart args)
{
Game.Scene.AddComponent<TimerComponent>();
Game.Scene.AddComponent<CoroutineLockComponent>();
Game.Scene.AddComponent<ConfigComponent>();
await ConfigComponent.Instance.LoadAsync();
Game.Scene.AddComponent<OpcodeTypeComponent>();
Game.Scene.AddComponent<MessageDispatcherComponent>();
Game.Scene.AddComponent<NetThreadComponent>();
Game.Scene.AddComponent<ZoneSceneManagerComponent>();
Game.Scene.AddComponent<GlobalComponent>();
Game.Scene.AddComponent<AIDispatcherComponent>();
Scene zoneScene = await SceneFactory.CreateZoneScene(1, "Game", Game.Scene);
await Game.EventSystem.Publish(new EventType.AppStartInitFinish() { ZoneScene = zoneScene });
}
}
|
需要注意的是20行的创建Scene代码,他会涉及网络组件和UI组件的添加
1
2
3
4
5
6
7
8
9
10
11
12
13
14
| public static async ETTask<Scene> CreateZoneScene(int zone, string name, Entity parent)
{
Scene zoneScene = EntitySceneFactory.CreateScene(Game.IdGenerater.GenerateInstanceId(), zone, SceneType.Zone, name, parent);
zoneScene.AddComponent<ZoneSceneFlagComponent>();
zoneScene.AddComponent<NetKcpComponent>();
zoneScene.AddComponent<UnitComponent>();
zoneScene.AddComponent<AIComponent, int>(1);
await Game.EventSystem.Publish(new EventType.AfterCreateZoneScene() {ZoneScene = zoneScene});
return zoneScene;
}
|
至此,客户端的初始化也结束了
双端通信流程
然后我们来走一下双端的通信流程
客户端发起RPC调用,服务端接受外网消息
以客户端发起登录请求,服务器处理为例
1
2
3
4
5
6
7
8
|
R2C_Login r2CLogin;
Session session = zoneScene.GetComponent<NetKcpComponent>().Create(NetworkHelper.ToIPEndPoint(address));
{
r2CLogin = (R2C_Login) await session.Call(new C2R_Login() { Account = account, Password = password });
}
session.Dispose();
|
Session.Send函数,注意当Service是内网类型时,会比外网类型多在包头写入一个long类型的的actor id,当然我们这里是客户端,是Outer类型,就不需要写入了
1
2
3
4
5
6
7
8
9
10
11
12
13
14
15
16
17
18
19
20
| public void Send(IMessage message)
{
switch (this.AService.ServiceType)
{
case ServiceType.Inner:
{
(ushort opcode, MemoryStream stream) = MessageSerializeHelper.MessageToStream(0, message);
OpcodeHelper.LogMsg(this.DomainZone(), opcode, message);
this.Send(0, stream);
break;
}
case ServiceType.Outer:
{
(ushort opcode, MemoryStream stream) = MessageSerializeHelper.MessageToStream(message);
OpcodeHelper.LogMsg(this.DomainZone(), opcode, message);
this.Send(0, stream);
break;
}
}
}
|
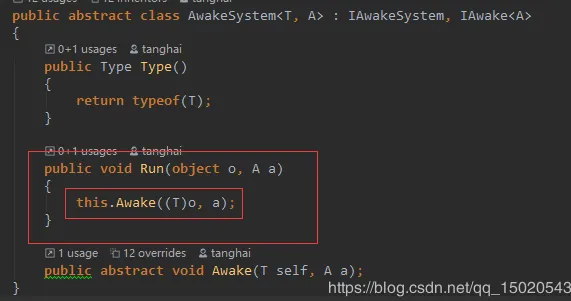
然后消息来到服务器这边,服务端的AService负责将接收到的服务端二进制数据流传递给NetKcpComponentSystem.OnRead函数,因为我们在创建NetKcpComponent时就将OnRead注册到ReadCallback回调里了
1
2
3
4
5
6
7
8
9
10
11
12
13
14
| [ObjectSystem]
public class NetKcpComponentAwakeSystem: AwakeSystem<NetKcpComponent>
{
public override void Awake(NetKcpComponent self)
{
self.MessageDispatcher = new OuterMessageDispatcher();
self.Service = new TService(NetThreadComponent.Instance.ThreadSynchronizationContext, ServiceType.Outer);
self.Service.ErrorCallback += (channelId, error) => self.OnError(channelId, error);
self.Service.ReadCallback += (channelId, Memory) => self.OnRead(channelId, Memory);
NetThreadComponent.Instance.Add(self.Service);
}
}
|
然后通过OuterMessageDispatcher.Dispatch进行消息的反序列化和分发,也就会来到C2R_LoginHandler
1
2
3
4
5
6
7
8
9
10
11
12
13
14
15
16
17
18
19
20
21
22
23
24
25
26
| [MessageHandler]
public class C2R_LoginHandler : AMRpcHandler<C2R_Login, R2C_Login>
{
protected override async ETTask Run(Session session, C2R_Login request, R2C_Login response, Action reply)
{
StartSceneConfig config = RealmGateAddressHelper.GetGate(session.DomainZone());
G2R_GetLoginKey g2RGetLoginKey = (G2R_GetLoginKey) await ActorMessageSenderComponent.Instance.Call(
config.InstanceId, new R2G_GetLoginKey() {Account = request.Account});
response.Address = config.OuterIPPort.ToString();
response.Key = g2RGetLoginKey.Key;
response.GateId = g2RGetLoginKey.GateId;
reply();
}
}
|
服务端内网消息流转
ActorMessageSenderComponent.Instance.Call会来到这里,其中NetInnerComponent.Instance.Get初次处理会因为我们没有为其创建Session而新建一个Session,IP和端口号就是我们配置表里的Process的IP和内网端口号
1
2
3
4
5
6
7
8
9
10
11
12
13
14
15
16
17
18
19
20
21
22
23
24
| public static void Send(this ActorMessageSenderComponent self, long actorId, MemoryStream memoryStream)
{
if (actorId == 0)
{
throw new Exception($"actor id is 0: {memoryStream.ToActorMessage()}");
}
ProcessActorId processActorId = new ProcessActorId(actorId);
Session session = NetInnerComponent.Instance.Get(processActorId.Process);
session.Send(processActorId.ActorId, memoryStream);
}
public static Session NetInnerComponent.Instance.Get(this NetInnerComponent self, long channelId)
{
Session session = self.GetChild<Session>(channelId);
if (session == null)
{
IPEndPoint ipEndPoint = StartProcessConfigCategory.Instance.Get((int) channelId).InnerIPPort;
session = self.CreateInner(channelId, ipEndPoint);
}
return session;
}
|
在Demo中就是自己给自己发送消息(AllServer模式),会来到R2G_GetLoginKeyHandler类,获取到loginKey之后就会给客户端回复消息,也就是会把分配的Gate的IP和端口号以及GateId返回给客户端
1
2
3
4
5
6
7
8
9
10
11
12
13
| [ActorMessageHandler]
public class R2G_GetLoginKeyHandler : AMActorRpcHandler<Scene, R2G_GetLoginKey, G2R_GetLoginKey>
{
protected override async ETTask Run(Scene scene, R2G_GetLoginKey request, G2R_GetLoginKey response, Action reply)
{
long key = RandomHelper.RandInt64();
scene.GetComponent<GateSessionKeyComponent>().Add(key, request.Account);
response.Key = key;
response.GateId = scene.Id;
reply();
await ETTask.CompletedTask;
}
}
|
然后客户端拿着这个gateSession往由服务器分配给自己的GateSession发送登陆信息
1
2
3
4
5
6
|
Session gateSession = zoneScene.GetComponent<NetKcpComponent().Create(NetworkHelper.ToIPEndPoint(r2CLogin.Address));
gateSession.AddComponent<PingComponent>();
zoneScene.AddComponent<SessionComponent>().Session = gateSession;
G2C_LoginGate g2CLoginGate = (G2C_LoginGate)await gateSession.Call(
new C2G_LoginGate() { Key = r2CLogin.Key, GateId = r2CLogin.GateId});
|
然后服务器接收,处理后告知客户端结果,此次交互结束,消息流程图如下
顺带提一嘴Actor模型在ET6.0的消息流转,核心就是由IdGenerater引申出的几个Id类,这个几个Id类通过内部的算法可以实现数据的压缩和反解密操作,从而方便的实现Id的转换和获取
机器人模块
机器人模块本质上是一个单独的工程,引用了客户端与服务端的代码,使用方式是通过命令行的方式进行控制,具体来说
编译并启动机器人工程相当于提供了一个完全虚拟的客户端+服务端环境,我们可以通过在终端中输入指定的命令来进行调试和测试
实现方式也非常的简洁,通过监听终端的输入,然后解析输入的内容,对应到Handler进行处理,核心代码位于
1
2
3
4
| ET/Robot/Hotfix/Robot/
ET/Robot/Hotfix/Module/RobotBase/
ET/Robot/Model/Robot/
ET/Robot/Model/Module/RobotBase/
|
总结
结构总结
ET6相对于ET5的架构发生了翻天覆地的变化
首先是ECS结构的变化,从Entity-Component-System变为了Entity-System模式,利用Entity必须设定Parent的限制来模拟ECS下的层级结构,非常方便,
其次是客户端分了5个程序集,这是为了方便机器人进程引用代码进行测试,其中除了Unity.Mono其余4个程序集都是热更的。更加详细的:
- Unity.Mono:所有冷更层代码
- Unity.Model:热更层的Model,纯数据
- Unity.ModelView:热更层的ModelView,涉及到Unity交互的都可以放在这里,例如相机类,UI类等,依旧是纯数据
- Unity.Hotfix:对应Unity.Model的纯逻辑
- Unity.HotfixView:对应Unity.ModeView的纯逻辑
然后是服务端,也发生了一些变化,完整的结构从外往里依次为
- Zone:一个大区,可以包含多个物理服务器
- Process:一个进程,一个物理服务器可以包含多个进程,可以直接对位计算机操作系统的进程概念
- Scene:一个功能组件,一个进程可以包含多个Scene
最后献上一张ET6.0网络层架构图
功能总结
可以看出ET6相对于ET5增添了很多革命性的功能和组件,个人感觉最厉害的是ETTask的优化和完善,支持了WaitAll这种操作,进一步提升了程序性能
然后就是机器人模块,可以非常方便的利用机器人进行测试,能够发现非常多隐蔽的BUG
至于AI模块,仅仅从功能来说的话,个人感觉中规中矩,处理简单的AI逻辑可能还行,复杂起来终究不如可视化的行为树来的更直观,但是如果配合上机器人模块就有的玩了,可以非常方便的写出机器人AI,组队,打怪,商城购物等等。

 微信
微信 支付宝
支付宝