建立一个基本的屏幕后处理脚本系统
屏幕后处理通常是在渲染完整个场景得到屏幕图像后,再对这个图像进行一系列操作,实现各种屏幕特效。例如景深(Depth of Field),运动模糊(Motion Blur)等。
1 2 3 4 5 6 MonoBehaviour.OnRenderImage (RenderTexture src, RenderTexture dest)
1 2 3 4 5 6 7 8 9 10 11 12 13 public static void Blit (Texture source, RenderTexture dest, Material mat, [DefaultValue("-1" )] int pass){ ... }
默认情况下,OnRenderImage函数会在所有的不透明和透明的Pass执行完毕后被调用,以便对场景所有所有游戏对象都产生影响。OnRenderImage函数前添加ImageEffectOpaque特性来实现。
1 2 3 4 5 [ImageEffectOpaque ] void OnRenderImage (RenderTexture src, RenderTexture dest ){ ... }
想在Unity实现屏幕后处理效果,过程如下:
检查一列条件是否满足,例如平台是否支持渲染纹理和屏幕特效
在摄像机添加一个用于屏幕后处理的脚本
在这个脚本中实现OnRenderImage函数来获取当前屏幕的渲染纹理
调用Graphics.Blit函数使用特定的Unity Shader来对当前图像进行处理
把返回的渲染纹理显示到屏幕上
对于复杂的屏幕特效,可以多次调用Graphics.Blit函数来对上一步的输出结果进行下一步处理
1
2
3
4
5
6
7
8
9
10
11
12
13
14
15
16
17
18
19
20
21
22
23
24
25
26
27
28
29
30
31
32
33
34
35
36
37
38
39
40
41
42
43
44
45
46
47
48
49
50
51
52
53
54
55
56
57
58
59
60
61
62
63
64
65
66
67
68
69
70
71
using UnityEngine;[ExecuteInEditMode ] [RequireComponent(typeof(Camera)) ] public class PostEffectsBase : MonoBehaviour { protected void CheckResources () { bool isSupported = CheckSupport(); if (isSupported == false ) { NotSupported(); } } protected bool CheckSupport () { if (SystemInfo.supportsImageEffects == false || SystemInfo.supportsRenderTextures == false ) { Debug.LogWarning("This platform does not support image effects or render textures." ); return false ; } return true ; } protected void NotSupported () { enabled = false ; } protected void Start () { CheckResources(); } protected Material CheckShaderAndCreateMaterial (Shader shader, Material material ) { if (shader == null ) { return null ; } if (shader.isSupported && material && material.shader == shader) return material; if (!shader.isSupported) { return null ; } material = new Material(shader); material.hideFlags = HideFlags.DontSave; return material ? material : null ; } }
调整屏幕的亮度,饱和度和对比度
1
2
3
4
5
6
7
8
9
10
11
12
13
14
15
16
17
18
19
20
21
22
23
24
25
26
27
28
29
30
31
32
33
34
35
36
37
38
39
using UnityEngine;using System.Collections;public class BrightnessSaturationAndContrast : PostEffectsBase { public Shader briSatConShader; private Material briSatConMaterial; public Material material { get { briSatConMaterial = CheckShaderAndCreateMaterial(briSatConShader, briSatConMaterial); return briSatConMaterial; } } [Range(0.0f, 3.0f) ] public float brightness = 1.0f ; [Range(0.0f, 3.0f) ] public float saturation = 1.0f ; [Range(0.0f, 3.0f) ] public float contrast = 1.0f ; void OnRenderImage (RenderTexture src, RenderTexture dest ) { if (material != null ) { material.SetFloat("_Brightness" , brightness); material.SetFloat("_Saturation" , saturation); material.SetFloat("_Contrast" , contrast); Graphics.Blit(src, dest, material); } else { Graphics.Blit(src, dest); } } }
1 2 3 4 5 6 7 8 9 10 11 12 13 14 15 16 17 18 19 20 21 22 23 24 25 26 27 28 29 30 31 32 33 34 35 36 37 38 39 40 41 42 43 44 45 46 47 48 49 50 51 52 53 54 55 56 57 58 59 60 61 62 63 64 65 66 67 68 69 70 71 72 73 74 75 76 77 78 79 80 Shader "Unity Shaders Book/Chapter 12 /Brightness Saturation And Contrast" { Properties { _MainTex ("Base (RGB)", 2 D) = "white" {} _Brightness ("Brightness", Float) = 1 _Saturation("Saturation", Float) = 1 _Contrast("Contrast", Float) = 1 } SubShader { Pass { ZTest Always Cull Off ZWrite Off CGPROGRAM #pragma vertex vert #pragma fragment frag #include "UnityCG.cginc" sampler2D _MainTex; half _Brightness; half _Saturation; half _Contrast; struct v2f { float4 pos : SV_POSITION; half2 uv: TEXCOORD0; }; v2f vert(appdata_img v) { v2f o; o.pos = UnityObjectToClipPos(v.vertex); o.uv = v.texcoord; return o; } fixed4 frag(v2f i) : SV_Target { fixed4 renderTex = tex2D(_MainTex, i.uv); fixed3 finalColor = renderTex.rgb * _Brightness; fixed luminance = 0.2125 * renderTex.r + 0.7154 * renderTex.g + 0.0721 * renderTex.b; fixed3 luminanceColor = fixed3(luminance, luminance, luminance); finalColor = lerp(luminanceColor, finalColor, _Saturation); fixed3 avgColor = fixed3(0.5 , 0.5 , 0.5 ); finalColor = lerp(avgColor, finalColor, _Contrast); return fixed4(finalColor, renderTex.a); } ENDCG } } Fallback Off }
边缘检测
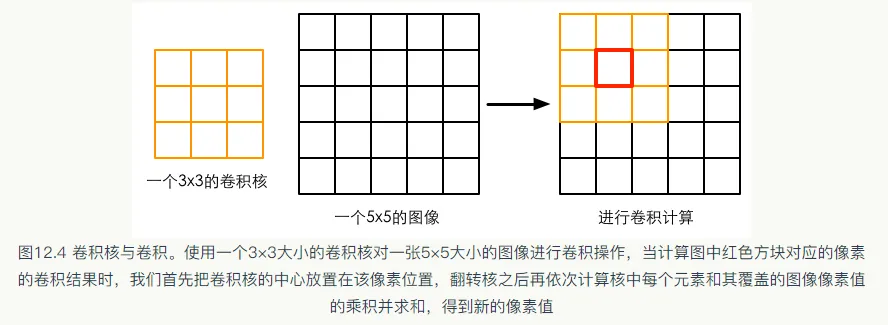
边缘检测的原理是利用一些边缘检测算子对图像进行卷积操作。
什么是卷积
在图像处理中,卷积操作指的就是使用一个卷积核对一张图像中的每个像素进行一系列操作。
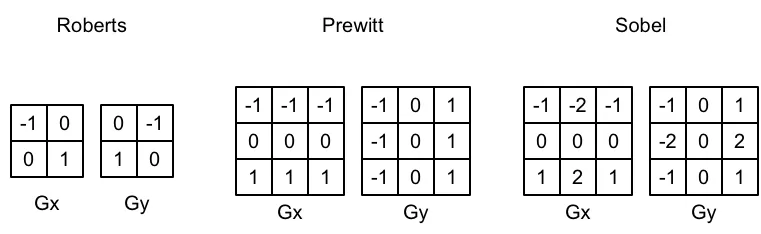
常见的边缘检测算子
梯度概念:如果相邻像素之间存在差别明显的颜色,亮度,纹理等属性,我们就会认为他们之间应该有一条边界。这种相邻像素之间的差值可以用梯度表示。G x G_x G x G y G_y G y
G = G x 2 + G y 2 G\;=\;\sqrt{G_x^2\;+G_y^2}
G = G x 2 + G y 2
由于包含了开根号操作,为了节省性能,有时会用绝对值操作来代替开根号操作:
G = ∣ G x ∣ + ∣ G y ∣ G\;=\;\left|G_x\right|\;+\;\left|G_y\right|
G = ∣ G x ∣ + ∣ G y ∣
得到梯度G之后,就可以据此来判断哪些像素对应了边缘(梯度值越大,越有可能是边缘点)
实现
使用Sobel算子进行边缘检测,实现描边效果。
1
2
3
4
5
6
7
8
9
10
11
12
13
14
15
16
17
18
19
20
21
22
23
24
25
26
27
28
29
30
31
32
33
34
35
36
37
38
39
40
41
42
43
44
45
46
47
48
using UnityEngine;using System.Collections;public class EdgeDetection : PostEffectsBase { public Shader edgeDetectShader; private Material edgeDetectMaterial = null ; public Material material { get { edgeDetectMaterial = CheckShaderAndCreateMaterial(edgeDetectShader, edgeDetectMaterial); return edgeDetectMaterial; } } [Range(0.0f, 1.0f) ] public float edgesOnly = 0.0f ; public Color edgeColor = Color.black; public Color backgroundColor = Color.white; void OnRenderImage (RenderTexture src, RenderTexture dest ) { if (material != null ) { material.SetFloat("_EdgeOnly" , edgesOnly); material.SetColor("_EdgeColor" , edgeColor); material.SetColor("_BackgroundColor" , backgroundColor); Graphics.Blit(src, dest, material); } else { Graphics.Blit(src, dest); } } }
1 2 3 4 5 6 7 8 9 10 11 12 13 14 15 16 17 18 19 20 21 22 23 24 25 26 27 28 29 30 31 32 33 34 35 36 37 38 39 40 41 42 43 44 45 46 47 48 49 50 51 52 53 54 55 56 57 58 59 60 61 62 63 64 65 66 67 68 69 70 71 72 73 74 75 76 77 78 79 80 81 82 83 84 85 86 87 88 89 90 91 92 93 94 95 96 97 98 99 100 101 102 103 104 105 106 107 108 109 110 111 Shader "Unity Shaders Book/Chapter 12 /Edge Detection" { Properties { _MainTex ("Base (RGB)", 2 D) = "white" {} _EdgeOnly ("Edge Only", Float) = 1.0 _EdgeColor ("Edge Color", Color) = (0 , 0 , 0 , 1 ) _BackgroundColor ("Background Color", Color) = (1 , 1 , 1 , 1 ) } SubShader { Pass { ZTest Always Cull Off ZWrite Off CGPROGRAM #include "UnityCG.cginc" #pragma vertex vert #pragma fragment fragSobel sampler2D _MainTex; uniform half4 _MainTex_TexelSize; fixed _EdgeOnly; fixed4 _EdgeColor; fixed4 _BackgroundColor; struct v2f { float4 pos : SV_POSITION; half2 uv[9 ] : TEXCOORD0; }; v2f vert(appdata_img v) { v2f o; o.pos = UnityObjectToClipPos(v.vertex); half2 uv = v.texcoord; o.uv[0 ] = uv + _MainTex_TexelSize.xy * half2(-1 , -1 ); o.uv[1 ] = uv + _MainTex_TexelSize.xy * half2(0 , -1 ); o.uv[2 ] = uv + _MainTex_TexelSize.xy * half2(1 , -1 ); o.uv[3 ] = uv + _MainTex_TexelSize.xy * half2(-1 , 0 ); o.uv[4 ] = uv + _MainTex_TexelSize.xy * half2(0 , 0 ); o.uv[5 ] = uv + _MainTex_TexelSize.xy * half2(1 , 0 ); o.uv[6 ] = uv + _MainTex_TexelSize.xy * half2(-1 , 1 ); o.uv[7 ] = uv + _MainTex_TexelSize.xy * half2(0 , 1 ); o.uv[8 ] = uv + _MainTex_TexelSize.xy * half2(1 , 1 ); return o; } fixed luminance(fixed4 color) { return 0.2125 * color.r + 0.7154 * color.g + 0.0721 * color.b; } half Sobel(v2f i) { const half Gx[9 ] = {-1 , 0 , 1 , -2 , 0 , 2 , -1 , 0 , 1 }; const half Gy[9 ] = {-1 , -2 , -1 , 0 , 0 , 0 , 1 , 2 , 1 }; half texColor; half edgeX = 0 ; half edgeY = 0 ; for (int it = 0 ; it < 9 ; it++) { texColor = luminance(tex2D(_MainTex, i.uv[it])); edgeX += texColor * Gx[it]; edgeY += texColor * Gy[it]; } half edge = 1 - abs (edgeX) - abs (edgeY); return edge; } fixed4 fragSobel(v2f i) : SV_Target { half edge = Sobel(i); fixed4 withEdgeColor = lerp(_EdgeColor, tex2D(_MainTex, i.uv[4 ]), edge); fixed4 onlyEdgeColor = lerp(_EdgeColor, _BackgroundColor, edge); return lerp(withEdgeColor, onlyEdgeColor, _EdgeOnly); } ENDCG } } FallBack Off }
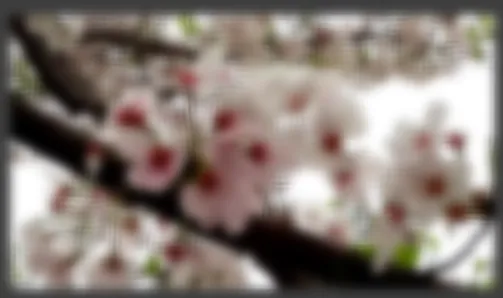
高斯模糊
模糊的实现有很多种方法,例如均值模糊和中值模糊(都使用了卷积核)。均值模糊同样使用了卷积操作,它使用的卷积核中的各个元素值都相等,且相加等于1。也就是说,卷积后得到的像素值是其邻域内各个像素值得平均值。
高斯滤波
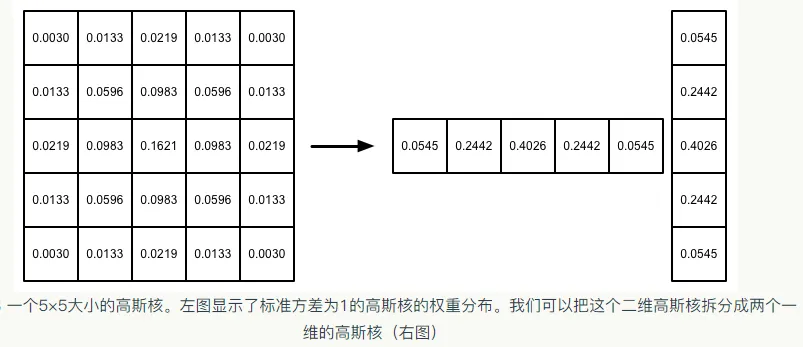
高斯模糊同样使用了卷积计算,它使用的卷积核名为高斯核。高斯核是一个正方形大小的滤波核,其中每个元素的计算都是基于下面的高斯方程:
G ( x , y ) = 1 2 π σ 2 e − x 2 + y 2 2 σ 2 G_{\left(x,y\right)}=\frac1{2\pi\sigma^2}e^{-\frac{x^2+y^2}{2\sigma^2}}
G ( x , y ) = 2 π σ 2 1 e − 2 σ 2 x 2 + y 2
σ \sigma σ
实现
1
2
3
4
5
6
7
8
9
10
11
12
13
14
15
16
17
18
19
20
21
22
23
24
25
26
27
28
29
30
31
32
33
34
35
36
37
38
39
40
41
42
43
44
45
46
47
48
49
50
51
52
53
54
55
56
57
58
59
60
61
62
63
64
65
66
67
68
69
70
71
72
73
74
75
76
77
using UnityEngine;using System.Collections;public class GaussianBlur : PostEffectsBase { public Shader gaussianBlurShader; private Material gaussianBlurMaterial = null ; public Material material { get { gaussianBlurMaterial = CheckShaderAndCreateMaterial(gaussianBlurShader, gaussianBlurMaterial); return gaussianBlurMaterial; } } [Range(0, 4) ] public int iterations = 3 ; [Range(0.2f, 3.0f) ] public float blurSpread = 0.6f ; [Range(1, 8) ] public int downSample = 2 ; void OnRenderImage (RenderTexture src, RenderTexture dest ) { if (material != null ) { int rtW = src.width / downSample; int rtH = src.height / downSample; RenderTexture buffer0 = RenderTexture.GetTemporary(rtW, rtH, 0 ); buffer0.filterMode = FilterMode.Bilinear; Graphics.Blit(src, buffer0); for (int i = 0 ; i < iterations; i++) { material.SetFloat("_BlurSize" , 1.0f + i * blurSpread); RenderTexture buffer1 = RenderTexture.GetTemporary(rtW, rtH, 0 ); Graphics.Blit(buffer0, buffer1, material, 0 ); RenderTexture.ReleaseTemporary(buffer0); buffer0 = buffer1; buffer1 = RenderTexture.GetTemporary(rtW, rtH, 0 ); Graphics.Blit(buffer0, buffer1, material, 1 ); RenderTexture.ReleaseTemporary(buffer0); buffer0 = buffer1; } Graphics.Blit(buffer0, dest); RenderTexture.ReleaseTemporary(buffer0); } else { Graphics.Blit(src, dest); } } }
1 2 3 4 5 6 7 8 9 10 11 12 13 14 15 16 17 18 19 20 21 22 23 24 25 26 27 28 29 30 31 32 33 34 35 36 37 38 39 40 41 42 43 44 45 46 47 48 49 50 51 52 53 54 55 56 57 58 59 60 61 62 63 64 65 66 67 68 69 70 71 72 73 74 75 76 77 78 79 80 81 82 83 84 85 86 87 88 89 90 91 92 93 94 95 96 97 98 99 100 101 102 103 104 105 106 107 108 Shader "Unity Shaders Book/Chapter 12 /Gaussian Blur" { Properties { _MainTex ("Base (RGB)", 2 D) = "white" {} _BlurSize ("Blur Size", Float) = 1.0 } SubShader { CGINCLUDE #include "UnityCG.cginc" sampler2D _MainTex; half4 _MainTex_TexelSize; float _BlurSize; struct v2f { float4 pos : SV_POSITION; half2 uv[5 ]: TEXCOORD0; }; v2f vertBlurVertical(appdata_img v) { v2f o; o.pos = UnityObjectToClipPos(v.vertex); half2 uv = v.texcoord; o.uv[0 ] = uv; o.uv[1 ] = uv + float2(0.0 , _MainTex_TexelSize.y * 1.0 ) * _BlurSize; o.uv[2 ] = uv - float2(0.0 , _MainTex_TexelSize.y * 1.0 ) * _BlurSize; o.uv[3 ] = uv + float2(0.0 , _MainTex_TexelSize.y * 2.0 ) * _BlurSize; o.uv[4 ] = uv - float2(0.0 , _MainTex_TexelSize.y * 2.0 ) * _BlurSize; return o; } v2f vertBlurHorizontal(appdata_img v) { v2f o; o.pos = UnityObjectToClipPos(v.vertex); half2 uv = v.texcoord; o.uv[0 ] = uv; o.uv[1 ] = uv + float2(_MainTex_TexelSize.x * 1.0 , 0.0 ) * _BlurSize; o.uv[2 ] = uv - float2(_MainTex_TexelSize.x * 1.0 , 0.0 ) * _BlurSize; o.uv[3 ] = uv + float2(_MainTex_TexelSize.x * 2.0 , 0.0 ) * _BlurSize; o.uv[4 ] = uv - float2(_MainTex_TexelSize.x * 2.0 , 0.0 ) * _BlurSize; return o; } fixed4 fragBlur(v2f i) : SV_Target { float weight[3 ] = {0.4026 , 0.2442 , 0.0545 }; fixed3 sum = tex2D(_MainTex, i.uv[0 ]).rgb * weight[0 ]; for (int it = 1 ; it < 3 ; it++) { sum += tex2D(_MainTex, i.uv[it*2 -1 ]).rgb * weight[it]; sum += tex2D(_MainTex, i.uv[it*2 ]).rgb * weight[it]; } return fixed4(sum, 1.0 ); } ENDCG ZTest Always Cull Off ZWrite Off Pass { NAME "GAUSSIAN_BLUR_VERTICAL" CGPROGRAM #pragma vertex vertBlurVertical #pragma fragment fragBlur ENDCG } Pass { NAME "GAUSSIAN_BLUR_HORIZONTAL" CGPROGRAM #pragma vertex vertBlurHorizontal #pragma fragment fragBlur ENDCG } } FallBack "Diffuse" }
Bloom效果
Bloom让画面中较亮的区域扩散到周围的区域中,造成一种朦胧的效果。
1
2
3
4
5
6
7
8
9
10
11
12
13
14
15
16
17
18
19
20
21
22
23
24
25
26
27
28
29
30
31
32
33
34
35
36
37
38
39
40
41
42
43
44
45
46
47
48
49
50
51
52
53
54
55
56
57
58
59
60
61
62
63
64
65
66
67
68
69
70
71
72
73
74
using UnityEngine;using System.Collections;public class Bloom : PostEffectsBase { public Shader bloomShader; private Material bloomMaterial = null ; public Material material { get { bloomMaterial = CheckShaderAndCreateMaterial(bloomShader, bloomMaterial); return bloomMaterial; } } [Range(0, 4) ] public int iterations = 3 ; [Range(0.2f, 3.0f) ] public float blurSpread = 0.6f ; [Range(1, 8) ] public int downSample = 2 ; [Range(0.0f, 4.0f) ] public float luminanceThreshold = 0.6f ; void OnRenderImage (RenderTexture src, RenderTexture dest ) { if (material != null ) { material.SetFloat("_LuminanceThreshold" , luminanceThreshold); int rtW = src.width / downSample; int rtH = src.height / downSample; RenderTexture buffer0 = RenderTexture.GetTemporary(rtW, rtH, 0 ); buffer0.filterMode = FilterMode.Bilinear; Graphics.Blit(src, buffer0, material, 0 ); for (int i = 0 ; i < iterations; i++) { material.SetFloat("_BlurSize" , 1.0f + i * blurSpread); RenderTexture buffer1 = RenderTexture.GetTemporary(rtW, rtH, 0 ); Graphics.Blit(buffer0, buffer1, material, 1 ); RenderTexture.ReleaseTemporary(buffer0); buffer0 = buffer1; buffer1 = RenderTexture.GetTemporary(rtW, rtH, 0 ); Graphics.Blit(buffer0, buffer1, material, 2 ); RenderTexture.ReleaseTemporary(buffer0); buffer0 = buffer1; } material.SetTexture("_Bloom" , buffer0); Graphics.Blit(src, dest, material, 3 ); RenderTexture.ReleaseTemporary(buffer0); } else { Graphics.Blit(src, dest); } } }
1 2 3 4 5 6 7 8 9 10 11 12 13 14 15 16 17 18 19 20 21 22 23 24 25 26 27 28 29 30 31 32 33 34 35 36 37 38 39 40 41 42 43 44 45 46 47 48 49 50 51 52 53 54 55 56 57 58 59 60 61 62 63 64 65 66 67 68 69 70 71 72 73 74 75 76 77 78 79 80 81 82 83 84 85 86 87 88 89 90 91 92 93 94 95 96 97 98 99 100 101 102 103 104 105 106 107 108 109 110 111 112 Shader "Unity Shaders Book/Chapter 12 /Bloom" { Properties { _MainTex ("Base (RGB)", 2 D) = "white" {} _Bloom ("Bloom (RGB)", 2 D) = "black" {} _LuminanceThreshold ("Luminance Threshold", Float) = 0.5 _BlurSize ("Blur Size", Float) = 1.0 } SubShader { CGINCLUDE #include "UnityCG.cginc" sampler2D _MainTex; half4 _MainTex_TexelSize; sampler2D _Bloom; float _LuminanceThreshold; float _BlurSize; struct v2f { float4 pos : SV_POSITION; half2 uv : TEXCOORD0; }; v2f vertExtractBright(appdata_img v) { v2f o; o.pos = UnityObjectToClipPos(v.vertex); o.uv = v.texcoord; return o; } fixed luminance(fixed4 color) { return 0.2125 * color.r + 0.7154 * color.g + 0.0721 * color.b; } fixed4 fragExtractBright(v2f i) : SV_Target { fixed4 c = tex2D(_MainTex, i.uv); fixed val = clamp (luminance(c) - _LuminanceThreshold, 0.0 , 1.0 ); return c * val; } struct v2fBloom { float4 pos : SV_POSITION; half4 uv : TEXCOORD0; }; v2fBloom vertBloom(appdata_img v) { v2fBloom o; o.pos = UnityObjectToClipPos (v.vertex); o.uv.xy = v.texcoord; o.uv.zw = v.texcoord; #if UNITY_UV_STARTS_AT_TOP if (_MainTex_TexelSize.y < 0.0 ) o.uv.w = 1.0 - o.uv.w; #endif return o; } fixed4 fragBloom(v2fBloom i) : SV_Target { return tex2D(_MainTex, i.uv.xy) + tex2D(_Bloom, i.uv.zw); } ENDCG ZTest Always Cull Off ZWrite Off Pass { CGPROGRAM #pragma vertex vertExtractBright #pragma fragment fragExtractBright ENDCG } UsePass "Unity Shaders Book/Chapter 12 /Gaussian Blur/GAUSSIAN_BLUR_VERTICAL" UsePass "Unity Shaders Book/Chapter 12 /Gaussian Blur/GAUSSIAN_BLUR_HORIZONTAL" Pass { CGPROGRAM #pragma vertex vertBloom #pragma fragment fragBloom ENDCG } } FallBack Off }
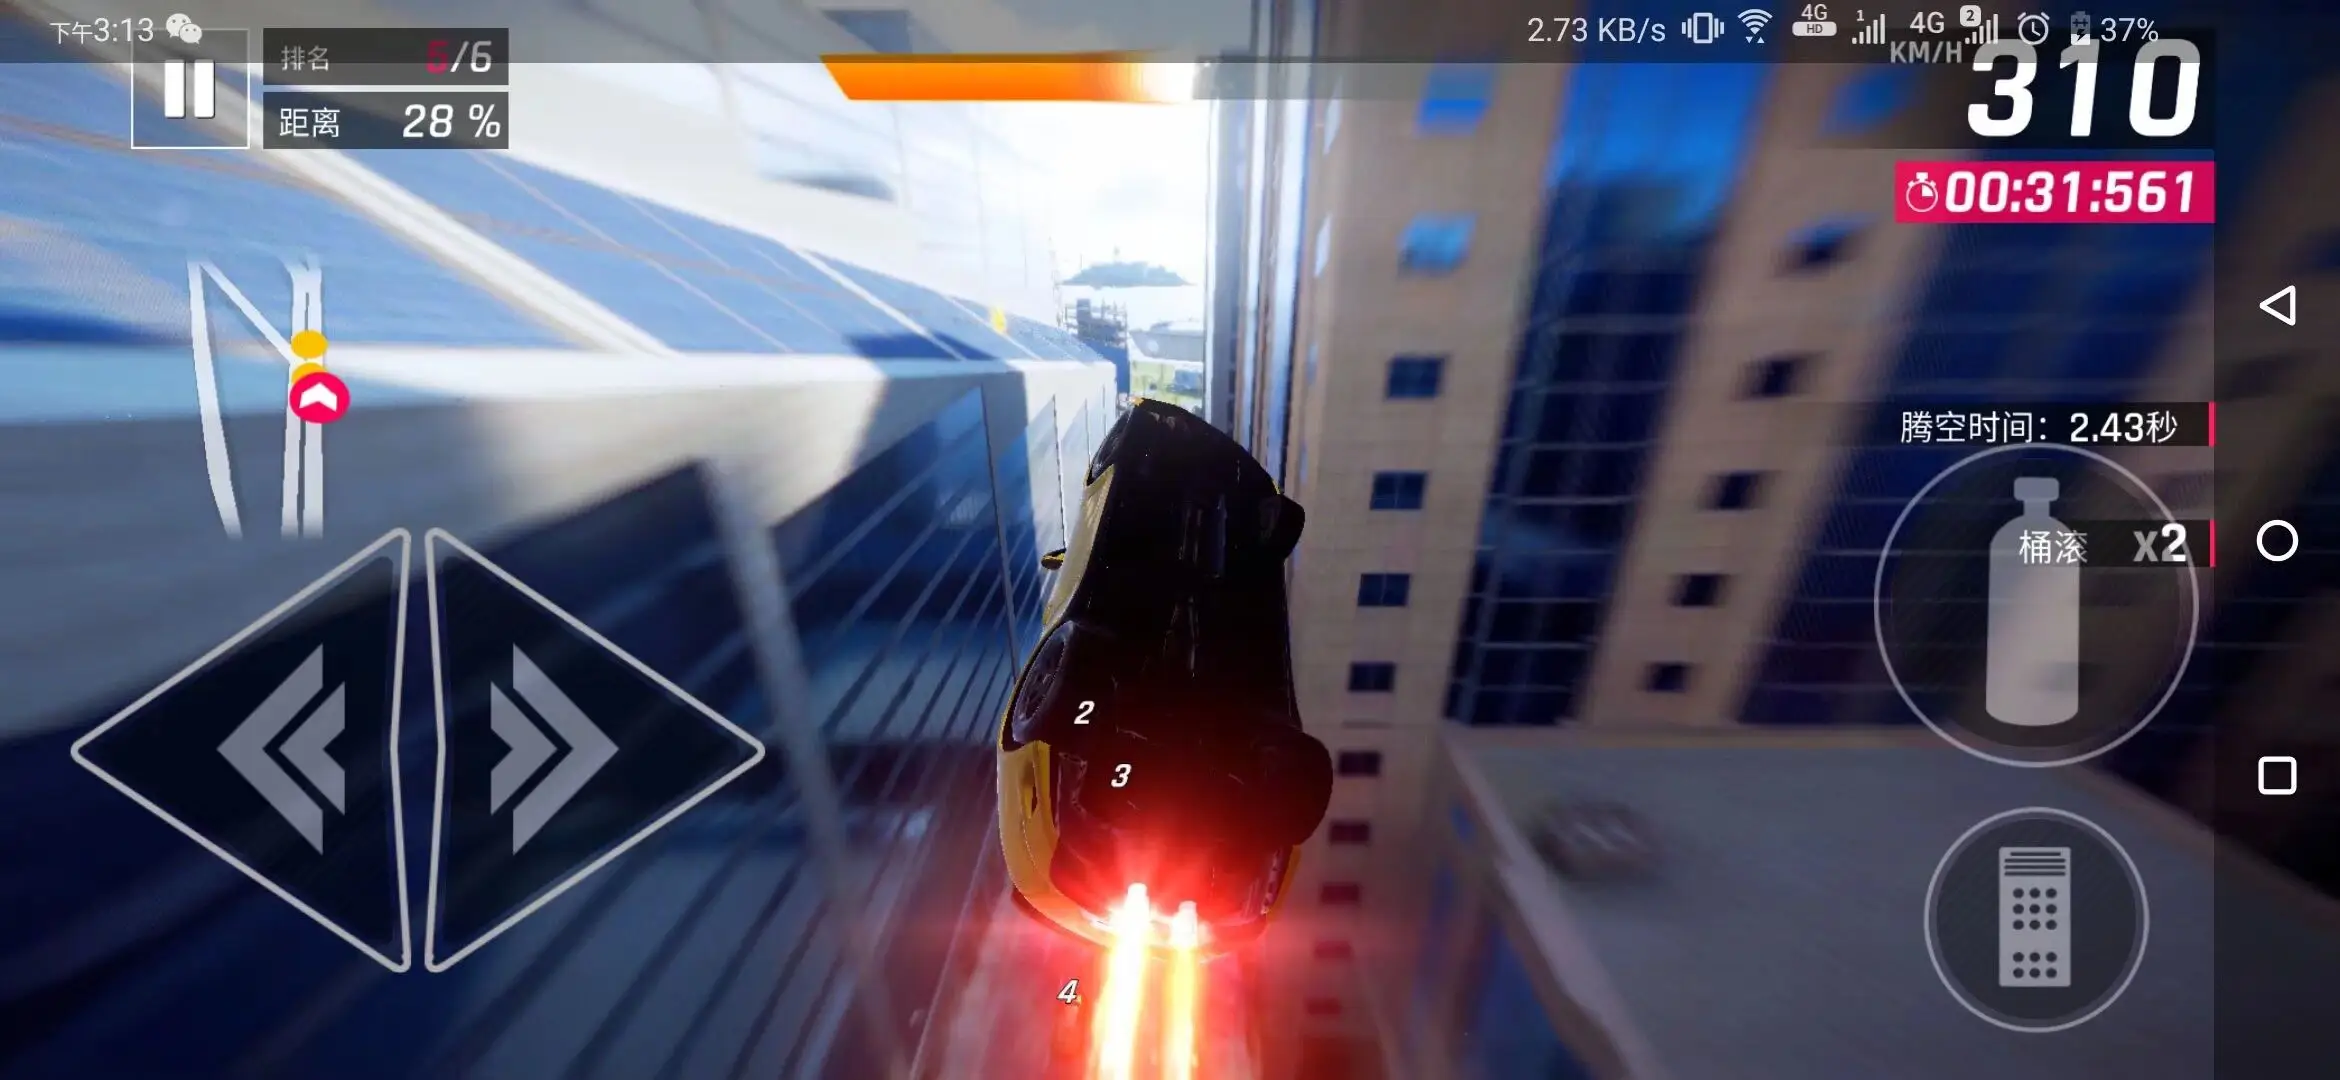
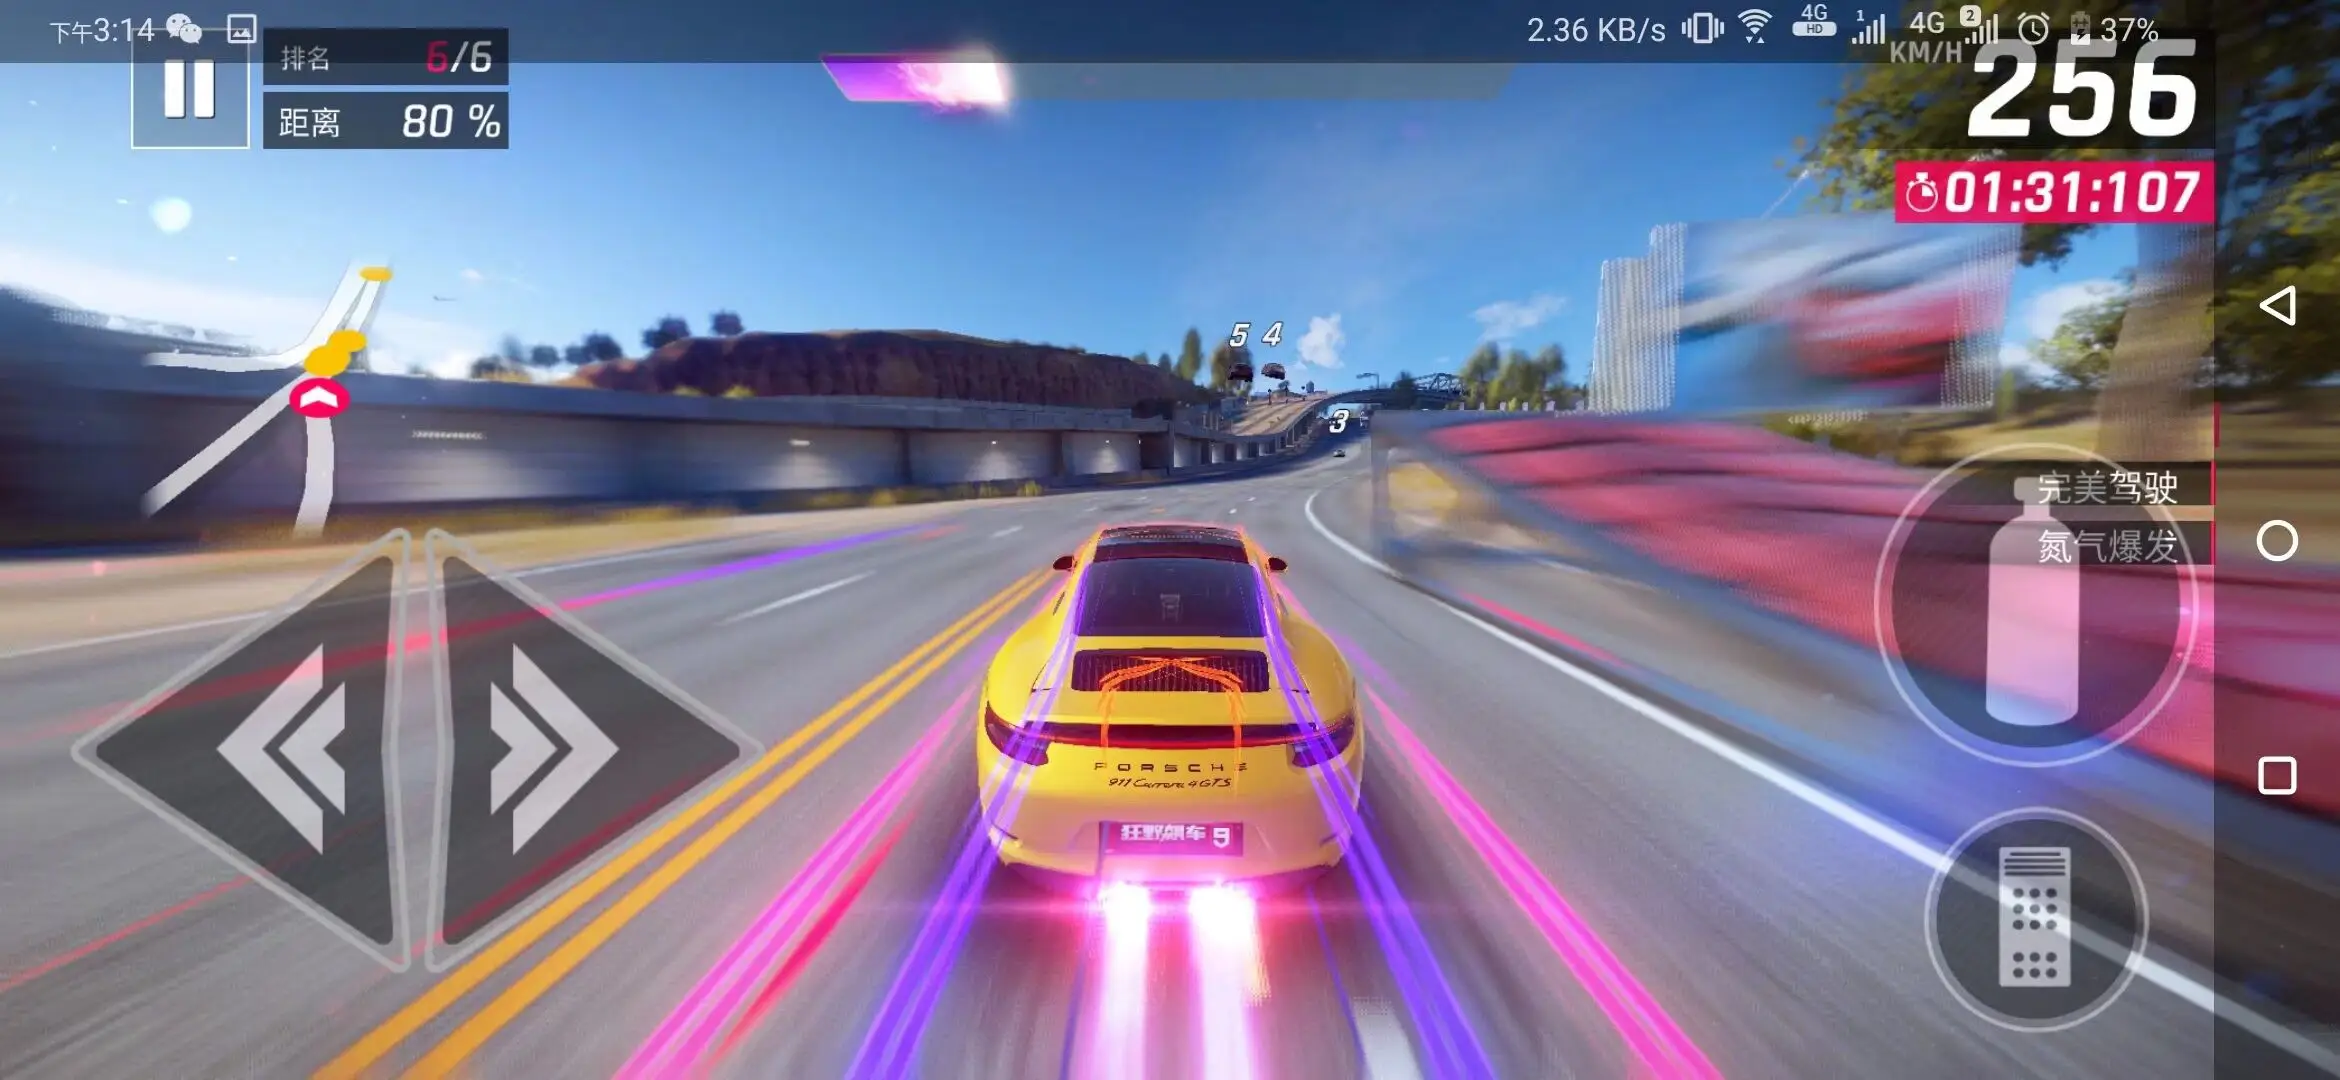
运动模糊
不用多嗦,直接上图。(狂野飙车9——竞速传奇)
1
2
3
4
5
6
7
8
9
10
11
12
13
14
15
16
17
18
19
20
21
22
23
24
25
26
27
28
29
30
31
32
33
34
35
36
37
38
39
40
41
42
43
44
45
46
47
48
49
50
51
52
53
54
55
56
57
58
59
60
61
62
63
64
65
66
67
68
69
70
using UnityEngine;using System.Collections;public class MotionBlur : PostEffectsBase { public Shader motionBlurShader; private Material motionBlurMaterial = null ; public Material material { get { motionBlurMaterial = CheckShaderAndCreateMaterial(motionBlurShader, motionBlurMaterial); return motionBlurMaterial; } } [Range(0.0f, 0.9f) ] public float blurAmount = 0.5f ; private RenderTexture accumulationTexture; void OnDisable () { DestroyImmediate(accumulationTexture); } [ImageEffectOpaque ] void OnRenderImage (RenderTexture src, RenderTexture dest ) { if (material != null ) { if (accumulationTexture == null || accumulationTexture.width != src.width || accumulationTexture.height != src.height) { DestroyImmediate(accumulationTexture); accumulationTexture = new RenderTexture(src.width, src.height, 0 ); accumulationTexture.hideFlags = HideFlags.HideAndDontSave; Graphics.Blit(src, accumulationTexture); } accumulationTexture.MarkRestoreExpected(); material.SetFloat("_BlurAmount" , 1.0f - blurAmount); Graphics.Blit(src, accumulationTexture, material); Graphics.Blit(accumulationTexture, dest); } else { Graphics.Blit(src, dest); } } }
1 2 3 4 5 6 7 8 9 10 11 12 13 14 15 16 17 18 19 20 21 22 23 24 25 26 27 28 29 30 31 32 33 34 35 36 37 38 39 40 41 42 43 44 45 46 47 48 49 50 51 52 53 54 55 56 57 58 59 60 61 62 63 64 65 66 67 68 69 70 71 72 73 74 75 76 77 78 Shader "Unity Shaders Book/Chapter 12 /Motion Blur" { Properties { _MainTex ("Base (RGB)", 2 D) = "white" {} _BlurAmount ("Blur Amount", Float) = 1.0 } SubShader { CGINCLUDE #include "UnityCG.cginc" sampler2D _MainTex; fixed _BlurAmount; struct v2f { float4 pos : SV_POSITION; half2 uv : TEXCOORD0; }; v2f vert(appdata_img v) { v2f o; o.pos = UnityObjectToClipPos(v.vertex); o.uv = v.texcoord; return o; } fixed4 fragRGB (v2f i) : SV_Target { return fixed4(tex2D(_MainTex, i.uv).rgb, _BlurAmount); } half4 fragA (v2f i) : SV_Target { return tex2D(_MainTex, i.uv); } ENDCG ZTest Always Cull Off ZWrite Off Pass { Blend SrcAlpha OneMinusSrcAlpha ColorMask RGB CGPROGRAM #pragma vertex vert #pragma fragment fragRGB ENDCG } Pass { Blend One Zero ColorMask A CGPROGRAM #pragma vertex vert #pragma fragment fragA ENDCG } } FallBack Off }


 微信
微信 支付宝
支付宝