前言
花了两周时间,学习了Lua,并且基于XLua搭建了一套热更新框架,包括开发环境,XLua实践,基础建设(基于lua-protobuf的配置表和网络协议),OOP框架,UI框架等。这篇博客的主要内容也就是叙述这些功能的实现过程,包括过程中遇到的一些坑和解决方案,主要以讲述思路为主,其实也是我的学习路线和思路分享,希望对想着手学习XLua的同好有所帮助。
开发环境搭建
XLua下载
由于我们后面还需要接入lua-protobuf,RapidJson,LPeg,FFI for lua53等第三方库,所以推荐直接从 build_xlua_with_libs 下载最新的Release包,根据自己的需求选择目标Lua版本的Release包进行下载即可。
其中较为重要的是Plugins目录下动态库的配置,因为此处配置不正确会导致不同平台可能会遇到运行时找不到动态库的报错,官方的动态库和配置信息(动态库的mate文件)是直接可用的。
如果有自己编译动态库的需求,需要注意不同编译选项得到的动态库在Unity这边所需要的配置也不一样,对于第三方动态库的编译和p/Invoke相关的内容,可以前往:Unity3D跨平台动态库编译—记kcp基于CMake的各平台构建实践 进行学习。
开发环境配置
IDE
Rider
Lua代码提示插件
EmmyLua
安装好插件后推荐添加Lua的目录,用以增强代码提示,在File-Settings-Languages & Frameworks-EmmyLua-Lua additional sources root选项中,点击右侧加号选择项目的Lua代码目录即可
在Lua调用Unity代码的智能提示
EmmyLua-Unity,这个插件在Rider官方市场找不到,可以去EmmyLua的QQ交流群下载,QQ群号:805629309,需要下载最新的发布的那个版本,同时需要将群里的EmmyLuaService.cs放入项目的Editor目录,随后在工具栏开启EmmyLua-Enable即可
Lua调试
EmmyLua自带,需要自己配置一下
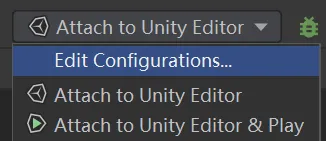
注意添加Debug选项的时候选择后面带New标识的,配置推荐如下
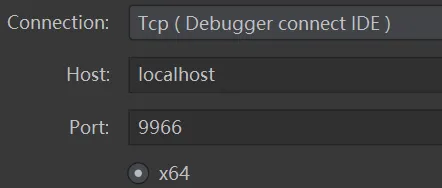
具体配置如下,这里推荐使用Debugger connect IDE,比较符合我们的操作习惯,即先在IDE开启Debug,随后在Unity启动游戏
最下方会有一个代码框,将这个代码框内的代码放入Lua侧的入口文件最头部即可,但是这样显然不够方便,我的做法如下:
首先将代码第一行提及的emmy_core.dll文件放到Unity工程中。因为EmmyLua Debug的原理就是Lua代码中通过 local dbg = require("emmy_core") 主动加载 emmy_core.dll到宿主程序中,并启动调试内核代码。调试内核通过socket与IDEA/VSCode侧连接通讯。
配置代码段第一行的路径,通过相对路径的方式进行读取emmy_core.dll即可(注意项目中一般都会自己写一个CustomLoader来自主控制Lua脚本的require行为,需要对emmy_core进行判断(仅在编辑器模式下),如果是它直接返回null),这样就可以保证其他同事不需要配置即可启动Debug功能。
将上一步配置好的那段代码复制粘贴到一个C#脚本中,用一个string字段存下来
在Unity侧的入口脚本提供一个XLua Debug选项,选项开启,就会在C#层LuaEnv.Dostring上一步的string字段,即可进行Debug
配置好之后如果想要Debug Lua,就从小虫子旁边的下拉框选择刚刚我们配置的Debug Configurations,然后点击小虫子即可。
Lua Profiler工具
Miku-LuaProfiler ,目前只支持Windows下,Unity5.6版本以上的编辑器进行使用,支持市场上所有版本的lua,包括各种魔改。
Lua规范制定
Lua这门语言要团队协作一定是要制定一个规范的,但是不同的团队可能有不同的语法习惯,这里就不多说啦(个人认为越多,越严格越好,小到括号规范,命名规范,大到模块规范,OOP规范都要严格制定)
但是对于EmmyLua插件的注解功能,是一定要严格遵循的,可以极大地增强项目Lua的智能联想和提示:EmmyLua插件注解功能
XLua实践
XLua本质是基于Lua开发了一套Unity与Lua交互的框架,使用起来相对于纯Lua来说要方便的多,类似Lua,C#互相调用,传值之类的操作,XLua内部帮我们做好了Warp。
在阅读此部分之前,请先阅读XLua官方文档
15分钟入门Lua
Learn Lua in 15 Minutes ,介绍了Lua的基本语法,注意点,基础OOP。
XLua CustomLoader相关
因为会有加密Lua文件的需求,所以CustomLoader是必不可少的,当然这是主要原因之一,另一个主要原因是我们写require的时候,并不想每次都写一大串路径出来,还容易出错
具体来说分为两部分
1.编辑器模式下直接通过遍历文件夹读取Lua文件
1
2
3
4
5
6
7
8
9
10
11
12
13
14
15
16
17
18
string targetLuaFileName = $"{fp} .lua" ;DirectoryInfo directoryInfo = new DirectoryInfo("Assets/StreamingAssets/LuaScripts/" ); FileInfo[] luaFiles = directoryInfo.GetFiles("*.lua" , SearchOption.AllDirectories); if (luaFiles.Length == 0 ){ Debug.LogError($"无法获取{fp} ,请检查文件是否存在" ); return null ; } else { foreach (var luaFile in luaFiles) { if (luaFile.FullName.Contains(targetLuaFileName)) { return File.ReadAllBytes(luaFile.FullName); } } }
2.真机模式下通过构建时自动生成的用于寻址的配置文件在指定路径读取Lua文件
1
2
3
4
5
6
7
8
9
10
11
12
13
14
15
16
17
18
public static void GenerateLuaPathConfig (){ DirectoryInfo targetDirectoryInfo = new DirectoryInfo("Assets/StreamingAssets/LuaScripts/" ); DirectoryInfo[] directoryInfos = targetDirectoryInfo.GetDirectories("*" , SearchOption.AllDirectories); using (var fileStream = File.Create("Assets/StreamingAssets/LuaScripts/LuaPathDefine.txt" )) { using (StreamWriter streamWriter = new StreamWriter(fileStream)) { streamWriter.WriteLine($"LuaScripts/" ); foreach (var directoryInfo in directoryInfos) { string toWritedPath = directoryInfo.FullName.Substring(directoryInfo.FullName.IndexOf("LuaScripts" )); streamWriter.WriteLine($"{toWritedPath.Replace('\\' , '/' )} /" ); } } } }
XLua标签配置
XLua共有如下几种标签,具体作用可在 xLua的配置 查看,打上这些标签后,XLua会为一些标签标记的类型生成优化代码,提高运行时性能,最重要的,可以有效防止IL2CPP的代码裁剪。
XLua.LuaCallCSharp
XLua.ReflectionUse
XLua.DoNotGen
XLua.CSharpCallLua
XLua.GCOptimize
XLua.AdditionalProperties
XLua.BlackList
XLua.Hotfix
CSObjectWrapEditor.GenPath
CSObjectWrapEditor.GenCodeMenu
其中尤为重要的是LuaCallCSharp, CSharpCallLua, Hotfix这三个互调用标签,推荐使用反射的方式进行自动配置,当然也可以预留手动配置的余地,可以有效控制一些比较特殊的类型
自动配置的方式XLua提供了一个示例:Tencent/xLua/blob/master/Assets/XLua/Editor/ExampleConfig.cs ,注意官方示例中扫描委托相关内容的时候只扫描了委托实例和返回值,参数为委托类型的方法,如果C#这边只定义了委托而没有使用的话是扫描不到的,需要自己修改下扫描代码或者手动添加到预留的配置列表里。
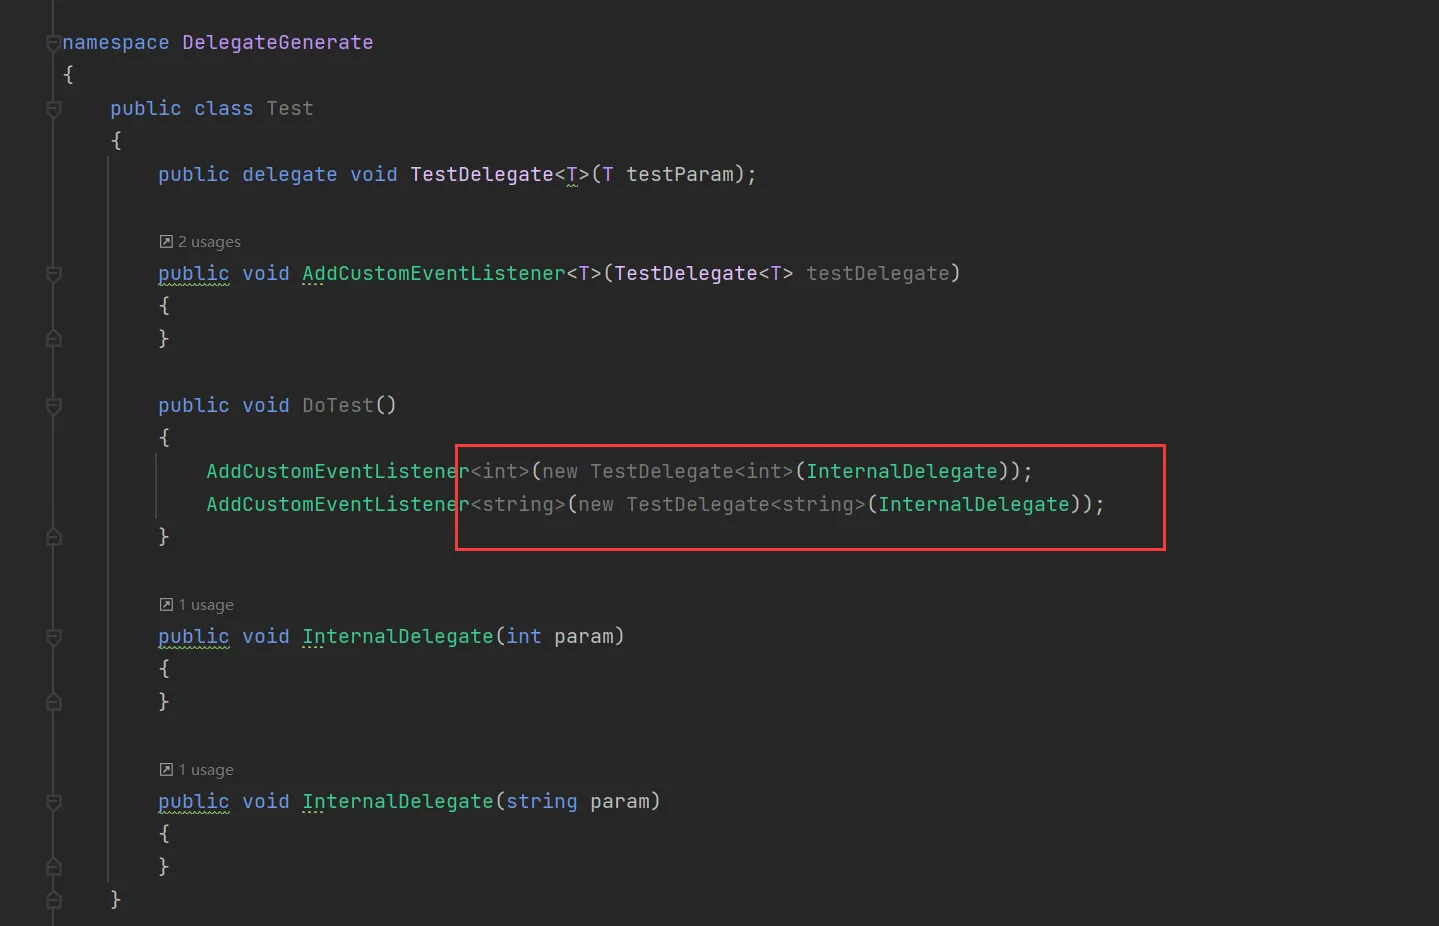
泛型委托自动注册CSharpCallLua
项目中可能会用到自定义的泛型委托,例如
1 public void delegate Test <T >(T param )
这种泛型委托每一种类型都是一个实例,比如
1 2 3 Test<int > Test<string > Test<CustomClass>
而且手动注册很难覆盖到项目中用到的所有类型,并且C#自带的反射没有办法扫描到这种泛型委托到底有哪些类型,也就没有办法自动注册
所以需要借助第三方编译库来实现这种泛型委托的自动扫描注册,目前比较主流的有两种
其中Mono.Ceil使用起来更加方便,学习成本更低,因为我们也只需要获取所有方法的IL代码即可得知泛型委托的具体类型从而进行注册,所以Mono.Ceil足矣
使用起来与C#自带反射差不多,具体可以参见 https://github.com/jbevain/cecil/wiki/HOWTO ,只需要取到MethodDefinition->MethodBody->instructions->OpCode/operand即可,其中OpCode为IL操作码,operand为具体的IL内容,可以通过断点查看内容
核心示例代码如下
1
2
3
4
5
6
7
8
9
10
11
12
13
14
15
16
17
AssemblyDefinition assemblyDefinition = AssemblyDefinition.ReadAssembly(targetScanDllName); foreach (var moduleDefinition in assemblyDefinition.Modules){ foreach (var classTypesTypeDefinition in moduleDefinition.Types) { foreach (var methodDefinition in classTypesTypeDefinition.Methods) { Mono.Cecil.Cil.MethodBody methodBody = methodDefinition.Body; if (methodBody?.Instructions != null ) { foreach (var instruction in methodBody.Instructions) { if (instruction.OpCode.Code == Mono.Cecil.Cil.Code.Newobj && instruction.Operand != null ) { string fullILContent = instruction.Operand.ToString(); if (fullILContent != "NUll" )
集成配置生成至构建流水线
1
2
3
4
5
6
7
8
9
10
11
12
13
public class XLuaAutoGenCode { public void Execute () { CSObjectWrapEditor.Generator.ClearAll(); CSObjectWrapEditor.Generator.GenAll(); } }
问题汇总
xLua: try to dispose a LuaEnv with C# callback!
https://www.jianshu.com/p/58d20d46560a
介绍了基础的解决方案,并且通过修改XLua C#侧ObjectTranslator.cs的代码的方式,通过打印Lua堆栈来告诉我们到底还有哪些C#侧引用的Lua的委托没有释放,查起泄露来非常方便,推荐魔改。
已经生成了代码,也进了dll,但还是报 This type must add to CSharpCallLua 之类的绑定错误
很有可能是因为DelegateBridgeExtensions的RegisterGenType调用时机落后于我们CSharp端绑定Lua端的生命周期函数,从而导致LuaEnv.DelegateBridgeType不是我们生成的DelegateBridgeExtensions,推荐修改生成模板:LuaDelegateBridge.tpl.txt
1 2 3 4 5 6 [RuntimeInitializeOnLoadMethod(RuntimeInitializeLoadType.BeforeSplashScreen) ] private static void RegisterGenType (){ LuaEnv.ObjectTranslatorCustomType = typeof (ObjectTranslatorExtensions); LuaEnv.DelegateBridgeType = typeof (DelegateBridgeExtensions); }
可以确保RegisterGenType调用先于我们的自己的绑定函数,从而奏效
基础建设
基于lua-protobuf的配置表读取
lua-protobuf支持pb2和pb3语法,但是使用上有一定的限制
除此之外需要在lua-protobuf基础上完善一些功能
支持热更的schema文件读取
首先是schema文件(也就是我们的.proto文件)的编译,protoc.lua 本身内部是通过lua的io进行读取的,但我们的schema文件是会热更的,所以需要修改protoc源码,支持自定义加载方式
思路也很简单,在 protoc.lua 文件中拓展一个自己的parsefile方法即可,通过C#侧的API读回schema文件内容即可
1
2
3
4
5
6
7
8
9
10
11
12
13
14
15
16
17
18
19
20
21
22
23
24
25
26
27
28
function Parser:CustomLoadfile (fn) local ret, pos = pb.load (self :CustomCompilefile(fn)) if ret then return ret, pos end error ("load failed at offset " .. pos) end function Parser:CustomCompilefile (fn) local set = do_compile(self , self .Parsefile, self , fn) return assert (pb.encode('.google.protobuf.FileDescriptorSet' , set)) end function Parser:CustomParsefile (name) local info = self .loaded [name] if info then return info end local content = CS.CSharpProtobufLoader.GetProtoFileContent(name) info = self :parse(content, name) if info ~= nil then return info end error ("module load error: " .. name .. "\n\t" .. table .concat (errors, "\n\t" )) return info end
调用的话就是直接CustomLoadfile即可
支持跨schema文件引用
首先是跨schema文件引用,也就是import功能,lua-protobuf官方提供了一个未找到import文件的回调——unknown_import,设置这个回调即可
1 2 3 4 protocInstance.unknown_import = function (self, module_name) return protocInstance.CustomLoadfile(module_name) end
基于lua-protobuf的网络协议
这一块和上面的配置表读取重合度很高,主要工作量在于C#侧主动适配Lua侧的发包和收包,需要对项目的封包协议比较了解,调用流程推荐为:
Lua发起网络请求调用,将schema所对应的Table序列化成byte[]当成参数传递到C#侧,然后C#进行封包,发送协议到服务端
收到服务端协议后进行解包,将解包后的二进制数据传递到Lua侧,Lua侧反序列化二进制数据为Table进行逻辑处理
然后需要注意主要有两点
Lua传到C#侧的委托记得加上CSharpCallLua标记
以及C#侧的byte[]直接对应Lua侧的string,Lua这边与byte[]对应的string不需要解码,直接可以反序列化成Lua的Table(当然这个table的结构要和schema对应)
OOP框架
推荐使用 30行实现Lua OOP 这个库,当然了,这个库提供的API比较自由,需要制定项目规范
30Log的Wiki已经写的非常详细,大家可以去学习一下 30Log的Wiki
我写了一份测试代码,里面有很多注释,应该对大家深入理解这个库有帮助
1
2
3
4
5
6
7
8
9
10
11
12
13
14
15
16
17
18
19
20
21
22
23
24
25
26
27
28
29
30
31
32
33
34
35
36
37
38
39
40
41
42
43
44
45
46
47
48
49
50
51
52
53
54
55
56
57
58
59
60
61
62
63
64
65
66
67
68
69
70
71
72
73
74
75
76
77
78
79
80
81
82
83
84
85
86
87
88
89
90
91
92
93
94
95
96
97
98
99
100
101
102
103
104
105
106
107
108
109
local Class = require ("30log" )local OOPTest = {}function OOPTest:Test () local WindowDefine = Class("Window" ) WindowDefine.Width = 140 WindowDefine.Height = 175 function WindowDefine:init (width, height) self .Width = width self .Height = height end Log(string .format ("WindowDefine ToStringOutPut = %s, Name = %s, Width = %d, Height = %d" , WindowDefine, WindowDefine.name, WindowDefine.Width, WindowDefine.Height)) local windowInstance = WindowDefine:new(150 , 180 ) Log(string .format ("windowInstance ToStringOutPut = %s, Name = %s, Width = %d, Height = %d" , windowInstance, windowInstance.name, windowInstance.Width, windowInstance.Height)) local PSPWindowDefine = WindowDefine:extend("PSPWindow" ) PSPWindowDefine.PSPVersion = 1 local pspWindowInstance = PSPWindowDefine:new() Log(string .format ("pspWindowInstance is instanceof WindowDefine? : %s -------- pspWindowInstance is instanceof PSPWindowDefine? : %s" , tostring (pspWindowInstance:instanceOf(WindowDefine)), tostring (pspWindowInstance:instanceOf(PSPWindowDefine)))) Log(pspWindowInstance.PSPVersion) pspWindowInstance.PSPVersion = 99 pspWindowInstance:cast(WindowDefine) Log(string .format ("pspWindowInstance is instanceof WindowDefine? : %s -------- pspWindowInstance is instanceof PSPWindowDefine? : %s" , tostring (pspWindowInstance:instanceOf(WindowDefine)), tostring (pspWindowInstance:instanceOf(PSPWindowDefine)))) Log(pspWindowInstance.PSPVersion) pspWindowInstance:cast(PSPWindowDefine) Log(string .format ("pspWindowInstance is instanceof WindowDefine? : %s -------- pspWindowInstance is instanceof PSPWindowDefine? : %s" , tostring (pspWindowInstance:instanceOf(WindowDefine)), tostring (pspWindowInstance:instanceOf(PSPWindowDefine)))) Log(pspWindowInstance.PSPVersion) Log(pspWindowInstance.super) function WindowDefine:GetInfo () Log("执行WindowDefine的GetInfo函数" ) return self .Width, self .Height end function PSPWindowDefine:init (width, height, pspVersion) self .super.init(self , width, height) self .PSPVersion = pspVersion end function PSPWindowDefine:GetInfo () Log("执行PSPWindowDefine的GetInfo函数" ) return self .Width, self .Height, self .PSPVersion end pspWindowInstance = PSPWindowDefine:new(1920 , 1080 , 10001 ) Log(pspWindowInstance:GetInfo()) Log(string .format ("pspWindowInstance self Width Value = %d, pspWindowInstance super Width Value = %d" , pspWindowInstance.Width, pspWindowInstance.super.Width)) Log(WindowDefine:classOf(PSPWindowDefine)) Log(PSPWindowDefine:subclassOf(WindowDefine)) local windowDefineSubClasses = WindowDefine:subclasses() local windowDefineInstances = WindowDefine:instances() for _, subClass in ipairs (windowDefineSubClasses) do Log(subClass) end for _, instances in ipairs (windowDefineInstances) do Log(instances) end local aClass = Class() local aTable = {} Log(Class.isClass(aClass)) Log(Class.isClass(aTable)) local aClass = Class() local instance = aClass() local sometable = {} Log(Class.isInstance(instance)) Log(Class.isInstance(sometable)) end return OOPTest
UI框架
基础框架
对于UI框架的实现,开源社区各有各的实现,但对我来说都不太满意,我的设计如下
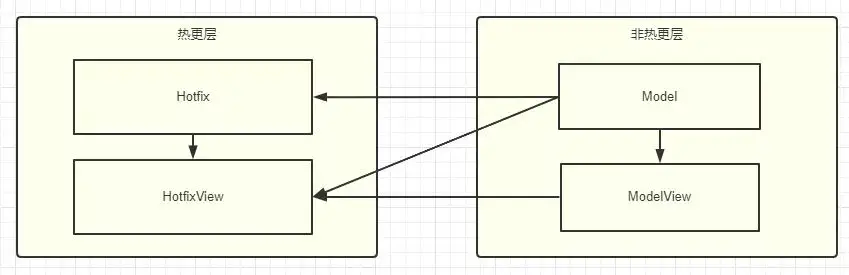
Hotfix UI的生命周期由Lua侧全盘托管
为每个UI提供一个纯数据的Table作为UI的数据模块,用于在UI资源没有到位的情况下先行测试
提供一个MVVM的数据绑定框架,一次绑定,即可无需关注UI的渲染状态,只关心逻辑即可
生命周期
对于第一点,比较简单,直接Lua这边有一个UIManager进行管理即可,更具体的
C#侧有一个XLuaManager管理整个Lua虚拟机环境,Lua侧有一个Lua逻辑入口例如为HotfixEntry.lua,与XLuaManager相连,由XLuaManager管理和驱动UIManager为Lua侧的一个单例,由HotfixEntry Update,并且管理所有的UI以及他们的生命周期
UI控件渲染和数据的分离
对于第二点,设计好UI控件和逻辑的分离即可,主要是思路的转变,我们游戏内一定不会是以UI上的数据为准,而是以游戏中自己计算的数据为准,游戏中的数据改变了,UI的渲染状态才会改变,所以就可以自然而然地拆分出一个纯数据的Table
UI控件渲染与数据的绑定
对于第三点,是工作量最大的,需要将第二步的Table同UI控件绑定起来
首先是UI控件需要在Lua侧索引,但是一个个手动去Find肯定是不现实的,所以需要使用代码生成的形式来做,正好我有个好友做过一个很强的UI自动绑定代码生成工具: ComponentAutoBindTool ,稍微修改下代码即可将导出代码从C#改为Lua,从而实现UI控件的自动绑定
其次是对于数据的绑定,需要将数据的改变相应到UI上,我发现了一个精简的数据绑定库:精简Lua MVVM实现原型 ,可以基于这个库实现一个MVVM的双向绑定,因为它不只支持表与方法的绑定,还支持表和表之间的绑定
UGUI的委托绑定
假设这样一个场景,需要对一个UGUI Button添加一个回调,这个回调里需要对这个UI的DataModel进行修改,也就是需要调用 self 关键字(当然也可以通过UIManager.GetUI的形式获取UI实例对象,但是心智负担太大,还容易出错),所以采用匿名函数的形式调用self(闭包)
1
2
3
self .Btn_BindTest.onClick:AddListener(function () self .DataModel.TestTxt = 100 end )
但是单纯的闭包由于对象一致性问题会导致RemoveListener无法正常进行
1 2 3 4 self .Btn_BindTest.onClick.RemoveListener(function () self .DataModel.TestTxt = 100 end )
所以我们需要在UIWindow做一个封装
1 2 3 4 5 6 7 8 9 10 11 12 13 14 15 16 17 18 19 20 21 22 23 24 25 26 27 28 29 30 31 32 33 34 35 36 37 38 39 40 41 42 43 44 45 46 47 48 49 50 51 52 53 54 55 56 function UIWindow:AddListenerToUGUI (uguiWidgetEvent, callback, callbackName) if callbackName == nil then callbackName = GetUGUICallbackId() end if table .containsKey(self .UGUICallbacks, callbackName) then LogError(string .format ("名称为:%d的委托已经被绑定,请勿重复绑定" , callbackName)) return end local f = function (...) callback(self , ...) end self .UGUICallbacks[callbackName] = { uguiWidgetEvent, f } uguiWidgetEvent:AddListener(f) end function UIWindow:RemoveListenerFromUGUI (callbackName) if not table .containsKey(self .UGUICallbacks, callbackName) then LogError(string .format ("要从UGUI控件解绑的名为:%s 回调不存在,这意味你未曾将其绑定至UGUI控件" , callbackName)) return end local uguiWidgetEvent = self .UGUICallbacks[callbackName][1 ] if uguiWidgetEvent then uguiWidgetEvent:RemoveListener(self .UGUICallbacks[callbackName][2 ]) uguiWidgetEvent:Invoke() end table .removeKey(self .UGUICallbacks, callbackName) end function UIWindow : RemoveAllListenerFromUGUI () for callbackName,_ in pairs (self .UGUICallbacks) do if not table .containsKey(self .UGUICallbacks, callbackName) then LogError(string .format ("要从UGUI控件解绑的名为:%s 回调不存在,这意味你未曾将其绑定至UGUI控件" , callbackName)) return end local uguiWidgetEvent = self .UGUICallbacks[callbackName][1 ] if uguiWidgetEvent then uguiWidgetEvent:RemoveListener(self .UGUICallbacks[callbackName][2 ]) uguiWidgetEvent:Invoke() end end table .clear(self .UGUICallbacks) end
UnityEvent泄露
使用LuaProfiler发现开关一个UI界面后,一定会有一个UnityEvent的泄露
翻看UnityEvent源码可以发现一些特殊处理,主要是为了防止此次UIcallback中再次移除别的UICallBack导致列表迭代器版本失效
1
2
3
4
5
6
7
8
9
10
11
12
13
14
15
16
17
18
19
20
21
22
23
24
25
26
27
28
29
30
31
32
33
private readonly List<BaseInvokableCall> m_RuntimeCalls = new List<BaseInvokableCall>();private readonly List<BaseInvokableCall> m_ExecutingCalls = new List<BaseInvokableCall>(); public void RemoveListener (object targetObj, MethodInfo method{ List<BaseInvokableCall> baseInvokableCallList = new List<BaseInvokableCall>(); for (int index = 0 ; index < this .m_RuntimeCalls.Count; ++index) { if (this .m_RuntimeCalls[index].Find(targetObj, method)) baseInvokableCallList.Add(this .m_RuntimeCalls[index]); } this .m_RuntimeCalls.RemoveAll(new Predicate<BaseInvokableCall>(baseInvokableCallList.Contains)); this .m_NeedsUpdate = true ; } protected void Invoke (object [] parameters{ List<BaseInvokableCall> baseInvokableCallList = this .PrepareInvoke(); for (int index = 0 ; index < baseInvokableCallList.Count; ++index) baseInvokableCallList[index].Invoke(parameters); } public List<BaseInvokableCall> PrepareInvoke (){ if (this .m_NeedsUpdate) { this .m_ExecutingCalls.Clear(); this .m_ExecutingCalls.AddRange((IEnumerable<BaseInvokableCall>) this .m_PersistentCalls); this .m_ExecutingCalls.AddRange((IEnumerable<BaseInvokableCall>) this .m_RuntimeCalls); this .m_NeedsUpdate = false ; } return this .m_ExecutingCalls; }
可以看到最终用于回调轮询的是m_ExecutingCalls,而我们执行RemoveListener操作只是移除了m_RuntimeCalls里的委托
如果此次RemoveListener操作来源于一个UnityEventBase A(也就是来自于m_ExecutingCalls中的一个回调),那么这个回调A就会一直被m_ExecutingCalls缓存,直到我们主动调用Invoke才会清空m_ExecutingCalls里的委托
(好挫)
学习资料汇总
我在学习过程中也积累了一些学习资料,在此处汇总下方便大家学习。
XLua调I用C#原理
Lua,C,C#互L调用原理
XLua Hotfix原R理
EmmyLua插T件注解功能
Unity3D跨Y平台动态库编译—记kcp基于CMake的各平台构建实践
解Y决xLua: try to dispose a LuaEnv with C# callback!
30行D实现Lua OOP
精S简Lua MVVM实现原型
深入Lua:函数和闭包
Learn Lua in 15 Minutes


 微信
微信 支付宝
支付宝